
Managing Disk Quotas on Windows Server 2019
Disk quota management provides a way of controlling the disk space available to users accessing the server and storing files.
When a user exceeds their quota, then they can no longer add additional data.
The File Server Resource Manager (FSRM) feature in Windows Server 2019 gives system administrators the ability to set the storage quota as well as determine the type of files that can be saved on the file server.
What is FSRM in Windows Server?
FSRM is a Windows Server feature which allows you to classify and save data in file servers. FSRM gives you extra control of the data on your computer.
The history of FSRM dates back to 2005 when Microsoft launched the product. It was initially used in the Windows 2003 server R3 edition. The feature provides a one-in-all solution, especially for volumes that keep increasing.
Disk quotas have been there for a long time. Without them, people could upload large volumes of data (mostly pirated videos, movies or MP3 songs) into your servers.
The large volume uploads can slow down your server and increase your operating costs. It also presents a challenge with copyright content.
Some tools, like Windows Explorer, allow you to assign quotas to volumes, but with some limitations.
Administrators can easily switch to Windows Server 2019 via the Storage Migration Service. With a myriad of useful features, Windows Server 2019 is the ultimate server for modern businesses.
You can integrate your server with existing applications and utilize every storage feature of FSRM.
The Storage Migration service identifies your old server’s data and moves it to your new server.
Whether you want to move into the cloud or latest Azure’s servers, this migration service is your best tool.
The migration server works with all servers from Windows Server 2003 to Server 2019.
It has no limitations, and will only require you to domain-link your old and new server. However, it only supports file transfers and not applications; you’ll have to manually reinstall your applications later.
FSRM Features
FSRM has the following five main features that help in accomplishing its tasks:
i. File classification structure
This disk quota feature automates all the data arranging processes. It helps administrators to access and use meaningful data.
In Windows Server 2019, the file classification structure comes with additional features for organizing server data more logically.
Examples of classification structures in Windows Servers include dynamic access control, file expiration, and file encryption. The dynamic access control policy limits users from accessing some files. Windows Server 2019 has complex file encryption techniques that protect your data from unauthorized users.
ii. File management tasks
This feature is available in most Windows Server versions. It assists the admin to apply policies or conditions on the data depending on how they are classified.
Such conditions include file properties, such as the date it was modified, file location, and last access date. The files classification can be done automatically by following the stipulated classification rules.
Alternatively, you can manually classify them by altering the file properties.
iii. Quota management
This feature enables an administrator to limit the size of folders or volumes. It is a useful feature, especially for new volumes and folders.
Besides, you can use this feature to create quota templates, which you can apply later to new folders and volumes.
iv. Storage reports
This component of FSRM is useful in identifying disk usage trends. It also helps administrators to understand how FSRM carries out data classification.
You can use the feature to monitor whether users are uploading unauthorized files.
v. File screening management
End-users may upload large gigabytes of data into your servers, resulting into a slow server with high manageability costs. You may also encounter challenges with compliance due to pirated movies and other content.
The file screening management feature helps you to tackle this problem by allowing you to regulate what end users can upload to your server.
File screening also lets you limit the extensions one can store in your shared files. For instance, you can create a file that prevents users from adding m4a. files on personal folders in the shared server system.
NB: FSRM only supports volumes with NTFS formats. It doesn’t support resilient volume types.
As we’ll demonstrate later, you can configure and manage these features that come with the File Server Resource Manager by using the FSRM app or the Windows PowerShell utility.
What you can do with FSRM
- Create a policy that allows access to folders and files depending on their organization in the file server
- Expire a file that has not been modified for a certain period of time
- Create up to 200 Megabyte (MB) quota for each user and notify them when their storage usage exceeds 180MB
- Schedule a day for reporting, such as Sundays. From the report, you can gauge the most accessed files in the previous two days before the report.
- Prevent users from adding music to personal shared folders
- Generate a file classification rule that categorizes files with more than ten types of information as having identifiable information.
Benefits of FSRM
1. Supports advanced quota management capabilities
Some tools, like Windows Explorer, have lesser capabilities for arranging and managing quotas. FSRM not only brings you a centralized console for managing your quotas per volume, but also per folders and per files. It has on-top notifications that you can use to effectively manage your quotas.
With FSRM quota tools, you can apply quotas on different paths in the same volume. NTFS quotas allow you to apply quotas per volume only and are less useful.
To apply a quota to different paths, you’ll need to set a quota template. Therefore, you can simply modify these quotas by updating the template. You can also create both soft and hard quotas.
2. Regulates server content
Managing quotas is not enough. You may need to keep potentially sensitive data off your servers. Piracy concerns are a major issue and require compliance from all stakeholders. Keep off pirated movies, MP3s or MP4s off your server, as having them could infringe on copyright regulations.
Copyright infringement is a serious offense and could lead to consequences like server closure. So, you need to be on the safe side by enabling the file screening capability. You can introduce file screening on a volume, folder, or file. For instance, you can stop users from saving files with .mp3 extension into C:/Personal finance.
Since the folder belongs only to finance-related files, other items like mp3 songs shouldn’t be allowed in the folder. If a user tries to save the file into the folder, the system generates an error.
The pop-up error will affect all users who want to upload such content to the server. Such users will not upload unwanted content to the site, hence improving your data management strategy. More so, you can monitor users who violate your regulations by posting unauthorized content.
To implement file screening, you will have to use file groups. Besides, you can apply file exclusions when configuring the file groups.
For example, you may want to block video files except those with .mp4 patterns. This way, users will be unable to save files unless they meet your defined pattern requirements. File exclusion is also possible with certain naming formats.
As such, users will be unable to save files unless they match your stipulated naming format.
3. Generates storage utilization reports
FSRM is probably the first tool which provides the data and statistics of volume usage. Microsoft initially perceived the tool to be used as a departmental server.
You can use FSRM to generate the following data reports:
- File location
- Duplicate files
- Last modified date
- Last access date
- File type
- Files and folder by property
- Folder by property
- Least and most recently accessed files
- Quota usage
These properties make FSRM an effective storage resource manager.
4. Locates files easily
FSRM allows you to locate files by sorting them. You can locate files easily by using file properties or performing tasks against these files.
Furthermore, you can search your files by sorting them using the last modified, name, or creation time property. Alternatively, you can use its location or file type property to locate a file easily among many other files.
How to install FSRM step-by-step
FSRM is the best tool for managing quotas and creating file screens. The techniques for installing the tool differ with every Windows Server edition. However, the basic rules apply to Windows Server 2019.
You’ll be required to download FSRM before starting the installation.
There are two main methods for installing FSRM in Windows Server 2019:
- PowerShell installation
- Graphical User Interface (GUI) installation
1. PowerShell installation
To install the FSRM role feature, you can follow the steps below:
- Open the PowerShell utility by pressing Windows key+ R
- Type PowerShell and press OK
- In the next window that appears, type the command below and press Enter:
Install-WindowsFeature -Name FS-Resource-Manager, RSAT-FSRM-Mgmt
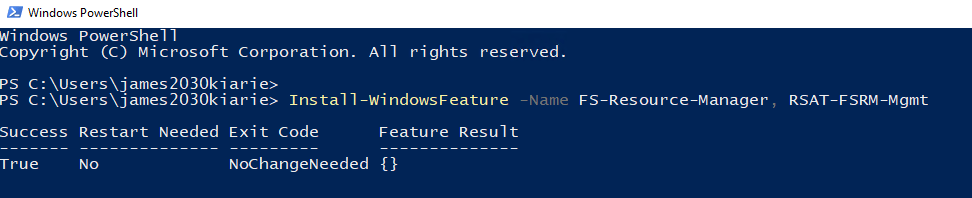
Entering the code will initiate the installation process for the FSRM role. You don’t have to restart your computer after the installation completes.
The FS-Resource-Manager will install FSRM while RSAT-FSRM-Mgmt will install the FSRM feature. This feature is important for accessing the GUI component, which manages FSRM. With the feature, you can easily run a server without the GUI. You’ll only be required to install the RSAT remotely; you can then access the FSRM system remotely.
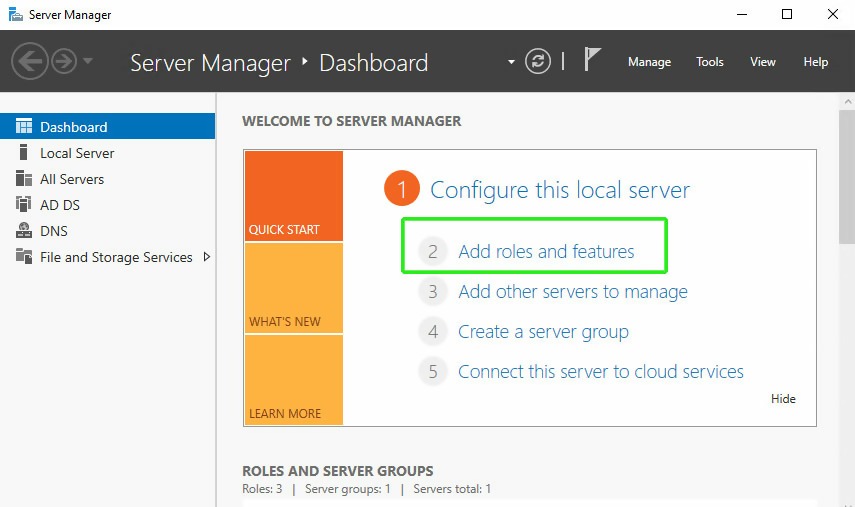
2. GUI installation
In case you want to install FSRM using the GUI instead of PowerShell, you’ll use the Server Manager. With the GUI, you’ll have to perform many tasks than when using the PowerShell installation.
Here are the steps for installing FSRM using GUI.
Open Server Manager and click on ‘Add roles and Features’:
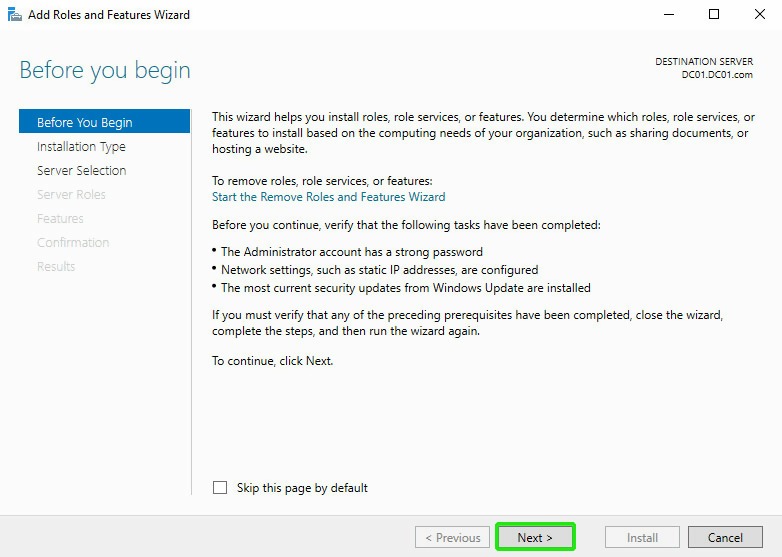
On the next Window, click ‘Next’:
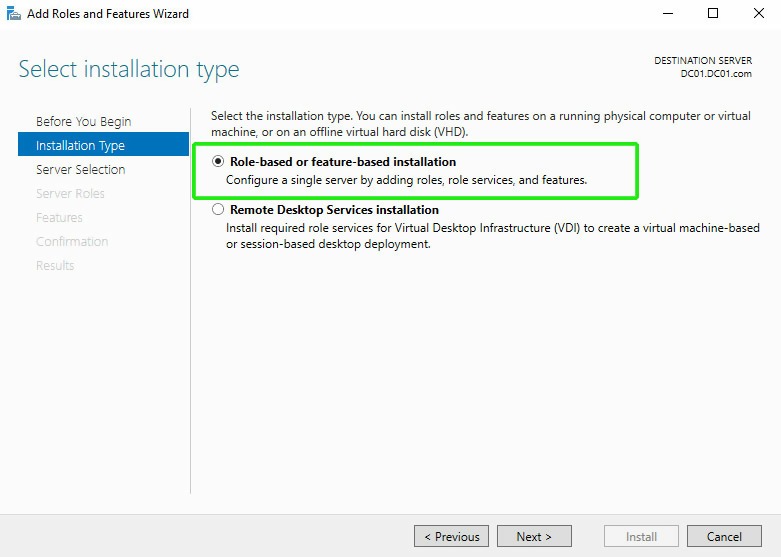
On the next screen, choose the “role-based or feature-based” option:
Choose a virtual hard disk or server you want to add its roles and features. Then, click “Next”:

On the “Select server roles” page, expand the File and Storage services tab:
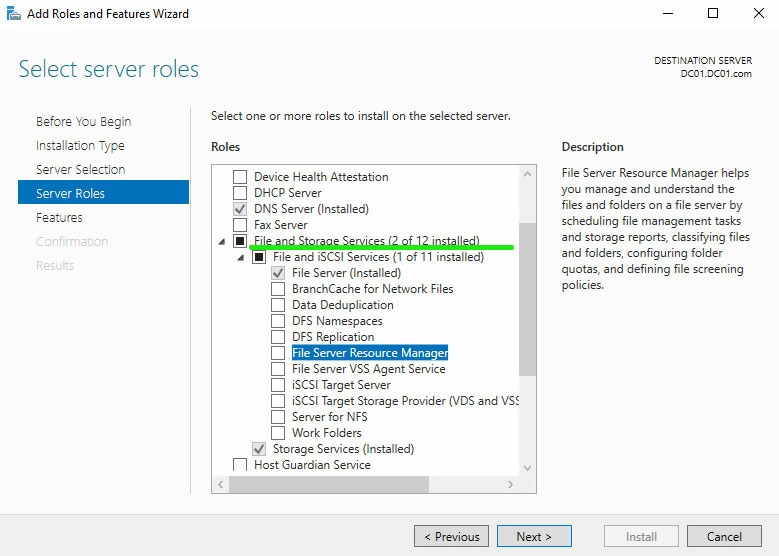
After checking the “File Server Resource Manager” box, click the “Next” button.
The next page will prompt you to install FSRM RSAT tools. Click “Add Features” and proceed:

Confirm the FSRM installation.
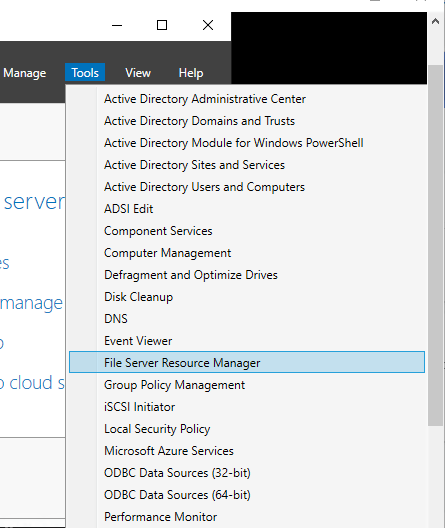
After waiting for the installation to complete, you can launch the FSRM from the server manager:
To access FSRM, Go to Tools > File Server Resource Manager:
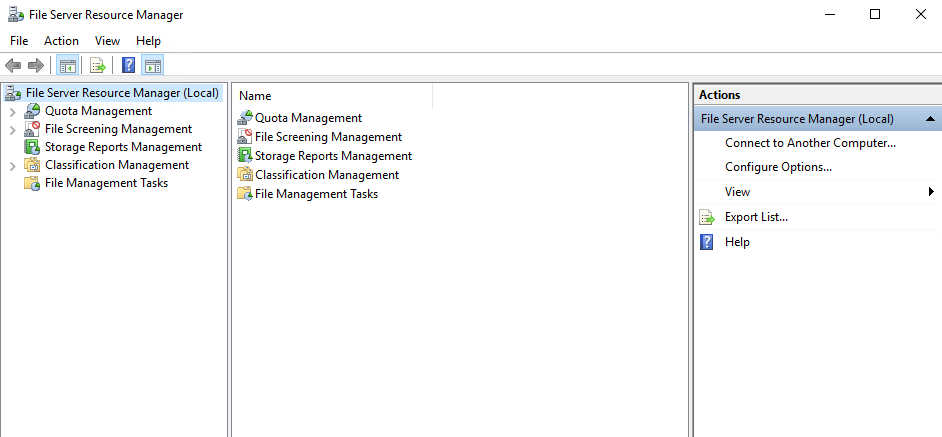
The FSRM window will open:
Configuring quotas
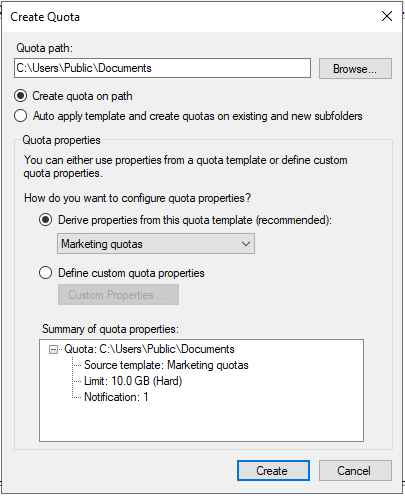
As mentioned earlier, quotas put a limit on the disk space allowed on a drive or a folder. Importantly, quotas come in handy when sharing a personal drive among many users. For example, you can put a limit of 10 GB on a drive or a folder.
There are two types of quotas:
- Quota on the path—this is a scenario where quota is applied on the main folder only
- Auto apply template and create quota—this is where the main folder together with the sub folders are all under a defined quota. That is, if you apply a quota of 10 GB on the parent folder, each of the subfolders will have a quota of 10 GB
Creating quota templates
Before embarking on creating quotas, let’s talk about how to create quota templates or predefined templates. Here are the steps.
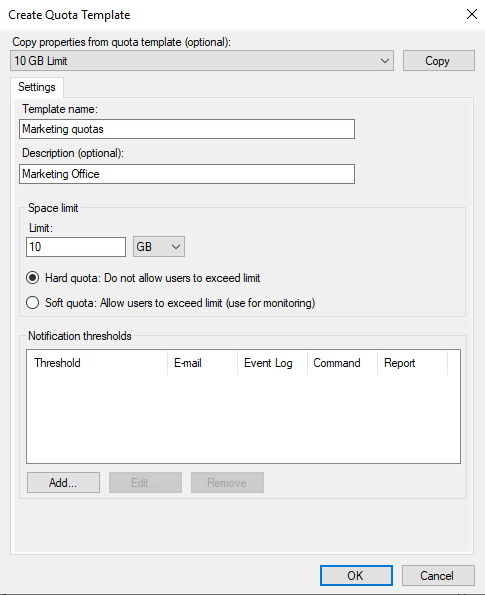
First, right click on Quota Templates and click on ‘Create Quota Template’ option:

Specify the quota name and the quota limit, as shown below. A hard quota implies that you cannot exceed the limit. For soft quota, you get notified when you exceed the limit.
When all is done, click ‘OK’:
If you wish to send notifications via email, click the ‘Add’ button:
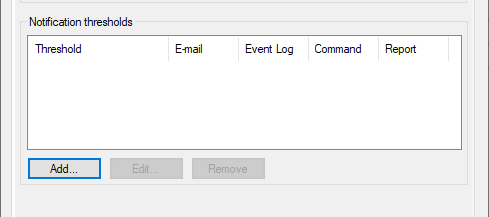
Then, fill out all the necessary details, such as the threshold for getting notifications and the administrator’s email.
Then click “OK”:

How to configure FSRM
Configuring FSRM is a piece of cake that consists of three main areas:
- Quota management
- File screening
- Storage reporting
1. How to create and manage quotas
In a shared server system, users can add their files to the server. To prevent overwhelming the server, the administrator can use quotas to allocate each user a storage portion.
There are two main types of quotas:
- Soft quotas whereby users can exceed the set limit. The administrator assesses the users in a specific path and their current storage usage; and, once the soft limit is passed, the server sends a usage warning or generates event logs.
- Hard quotas whereby a user cannot exceed the set limit. Once a user reaches the limits, they will be unable to store more data to the file path.
How to create a quota
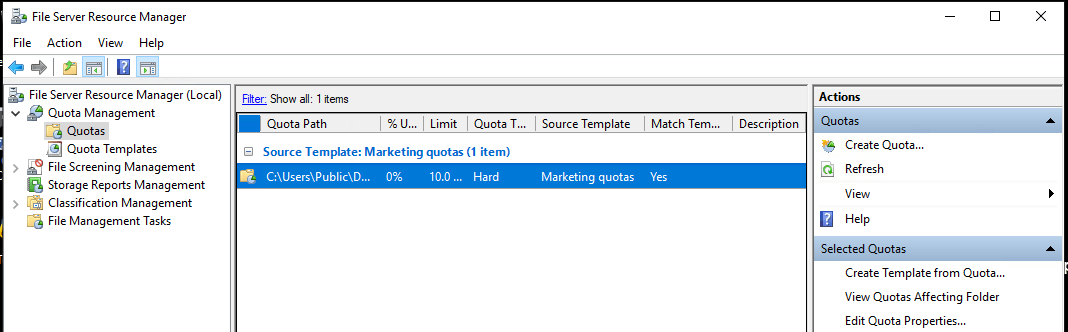
First, go to the FSRM management interface and select “Quotas”. Then, Select the “Create Quota” option:

Next, you can create a new quota by specifying various options, such as:
- The path for new quota—indicates the path for your new quota. Alternatively, you can apply it to existing folders and subfolders.
- Custom quota properties—you can choose soft and hard quota limits. For a soft limit, you’ll need to enter a warning notification.
Lastly, click the Create button.
Finally, the quota will now be created, and you can see it from the console, as shown below:
2. Configuring file screening
File screening is restricting some file formats from being stored in a path. It is only possible with file names and not file contents.
FSRM comes with two categories of file screening:
- Active screening—does not allow users to save restricted files
- Passive screening—enables users to save restricted data but with monitoring
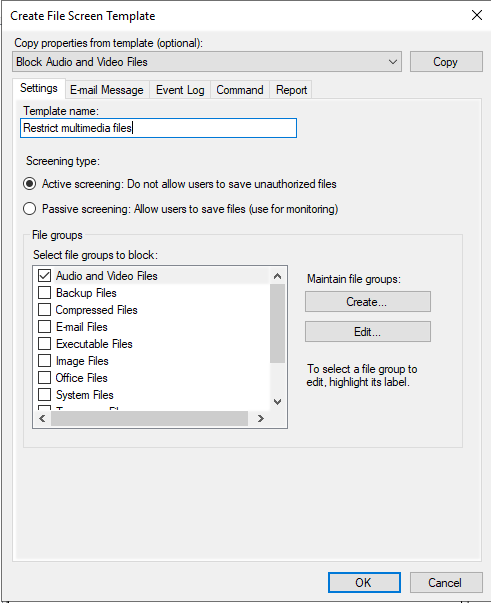
How to configure file screening template
If you want to create a file screening template, right click on the File Screen Template option:
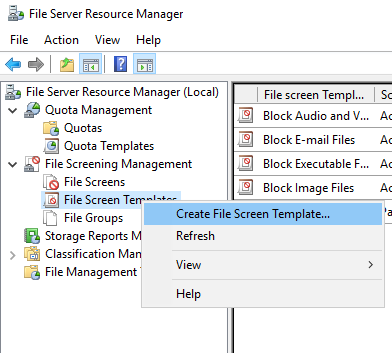
In the pull-down menu, click on “Create File Screen Template”. Then, fill all the required details in the Template Window:
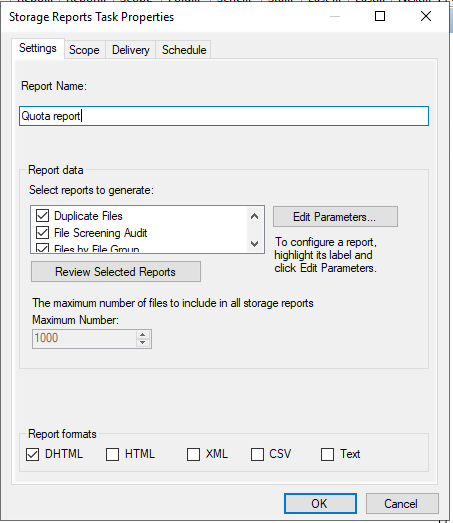
3. Generating reports
FSRM allows you to generate various reports that assist with your file server management tasks. You can schedule these reports over a certain period to monitor disk usage trends.
The reports can help you to monitor a user or groups of users who may attempt to store unauthorized files on your server. The FSRM tool allows you to generate such reports instantly.
To access your reports, you can open the file report tasks. Click “generate report” and press “OK”. The system will generate a DHTML report and prompt you to open it.
Conclusion
Those are the everyday tasks you can perform with the File Server Resource Manager 2019. You can also perform complex tasks such as File Server Classification.
Do you have any comments or questions?
Please post them below.
Report the NTFS Permissions of Folders and Shares – fast and simple to use!
Protect yourself and your clients against security leaks and get your free trial of the easiest and fastest NTFS Permission Reporter now!


Leave a Reply
Want to join the discussion?Feel free to contribute!