Windows Server Disk Quota – Overview

Windows Server system comes with a very handy feature that allows the creation of many user accounts on a shared system. This enables users to log in and have their own disk space and other custom settings. However, the drawback with this feature is that users have unlimited disk space usage, and with time, space eventually gets filled up leading to a slow or malfunctioning system, which is a real mess. Have you ever wondered how you can avert this situation and set user limits to disk volume usage?

Worry no more. To overcome the scenario described above Windows came up with the disk quota functionality. This feature allows you to dictate or set limits on hard disk utilization space such that users are restricted to the size of disk space they can use for their files. The functionality is available for both Windows and Unix systems like Linux that are being shared by many users. In Linux, it supports ext2, ext3, ext4 and XFS filesystems. In Windows operating systems, it’s supported in Windows 2000 and later versions. It’s important to point out that in Windows, this functionality can only be configured on NTFS file systems only. So, If you are starting out with a Windows server or client system, you may to consider formatting the volumes to NTFS filesystem to avert complications later on. Quotas can be applied to both client and server systems like Windows server 2008, 2012 and 2016. In addition to that, quotas cannot be configured on individual files or folders. They can only be set on volumes and restrictions apply to those volumes only. To be able to administer a disk quota, one must either be an administrator or have administrative privileges, that is, be a member of Administrator’s group.

The idea behind setting limits is to prevent the hard disk from getting filled up and thereby causing the system or server to freeze or behave abnormally. When a quota is surpassed, the user receives an “insufficient disk space error” warning and cannot, therefore, create or save any more files. A quota is a limit that is normally set by the administrator to restrict disk space utilization. This will prevent careless or unmindful users from filling up the disk space leading to a host of other problems including slowing down or freeing of the system. Quotas are ideally applicable in enterprise environments where many users access the server to save or upload documents. An administrator will want to assign a maximum disk space limit so that end users are confined to uploading work files only like Word, PowerPoint and Excel documents. The idea behind this is to prevent them from filling the disk with other non-essential and personal files like images, videos and music files which take up a significant amount of space. A disk quota can be configured as per user or per group basis. A perfect example of disk quota usage is in Web hosting platforms such as cPanel or Vesta CP whereby users are allocated a fixed disk space usage according to the subscription payment.

When a disk quota system is implemented, users cannot save or upload files to the system beyond the limit threshold. For instance, if an administrator sets a limit of 10 GB on disk space for all logon users, the users cannot save files exceeding the 10G limit. If a limit is exceeded, the only way out is to delete existing files, request another user to take ownership of some files or request the administrator, who’s the God of the system, to allocate you more space. It’s important to note that you cannot increase the disk space by compressing files. This is because quotas are based on uncompressed files and Windows treats compressed files based on their original uncompressed size. There are two types of limits: Hard limits and soft limits. A hard limit refers to the maximum possible space that the system can grant an end user. If for instance, a hard limit of 10G is set on a hard drive, the end user can no longer create and save files once the 10G limit is reached. This restriction will force them to look for an alternative storage location elsewhere or delete existing files

A soft limit, on the other hand, can temporarily be exceeded by an end user but should not go beyond the hard limit. As it approaches the hard limit, the end user will receive a string of email notifications warning them that they are approaching the hard limit. In a nutshell, a soft limit gives you a grace period but a hard limit will not give you one. A soft limit is set slightly below the hard limit. If a hard limit of, say 20G is set, a soft limit of 19G would be appropriate. It’s also worth mentioning that end users can scale up their soft limits up to the hard limit. They can also scale down their soft limits to zero. As for hard limits, end users can scale them down but cannot increase them. For purposes of courtesy, soft limits are usually configured for C level executives so that they can get friendly reminders when they are about to approach the Hard limit.

In summary, we have seen how handy disk quota is especially when it comes to a PC or a server that is shared by many users. Its ability to limit disk space utilization ensures that the disk is not filled up by users leading to malfunctioning or ‘freezing’ of the server. In our next topic, we’ll elaborate in detail how we apply or implement the quotas.

File System Attacks on Microsoft Windows Server

Most common File System Attacks on Microsoft Windows Server systems are an Active Directory targeted attacks, which is, based on a fact that AD is a “heart” of any Windows-based system. The bit less common, but still, very dangerous ( and interesting), can be File system attacks.

In this article, we investigated most common ways of filesystem attacks and protection against it.

The goal of File System Attacks is always the data, pieces of information stored on a server, important for any reason to any side that planned an attack. To get to data, first thing, attacker needs are credentials, as more elevated account, as better.

In this article, we will not write about credentials theft, that could be a topic for itself, but we will assume, that attacker already breached organization, and got the Domain administrator credentials.

Finding File Shares

The first step is finding the Data, a place where it “lives”.

For that, the tools are coming out the front. Most of the tools, attackers are using, are penetration testing tools, like, in our example smbmap, or PowerShell ( we will show both ways)

SMBMap, as git hub says “ allows users to enumerate samba share drives across an entire domain. List share drives, drive permissions, share contents, upload/download functionality, file name auto-download pattern matching, and even execute remote commands. This tool was designed with pen testing in mind, and is intended to simplify searching for potentially sensitive data across large networks”

So with a usage of Smbmap’s features, attackers will find all the file shares on those hosts and determine what sort of access, Permissions, and more detailed info about any file share on the system.

Another common way of determining the data location is PowerShell based.

By definition – PowerSploit is a collection of Microsoft PowerShell modules that can be used to aid penetration testers during all phases of an assessment.

And like smbmap, PowerSploit has a huge number of features. For finding data shares, attackers use Invoke-ShareFinder cmdlet, which will, in the combination of other PowerSploit features, show exactly the same things as smbmap, that means all information necessary to access and use data.

Protection

Of course, examples, above, are a just brief description of attacks that can list your data shares to the potential attacker, but, no matter, it is clear, that listing your data is a first step to getting it.

So here are some recommended actions to protect your system:

Removing open shares: Reduce open shares as much as possible. It is ok to have some if explicitly needed by a job, but sometimes, open shares are just result of lousy made permissions. Check out your default permissions ( default permissions are equivalent to open), change them properly, and avoid easy listing for the potential attacker

Monitor first time access activity – this is more an admin tip than a protection method, but it can be important. If you notice, a user has a right to share but never used it, and all the sudden, activity on that account changes, and steps out of “normal”, it could be a sign that account credentials are hijacked.

Check for potentially harmful software, not as malware, but a hint. SmbMap is built in python, so if noticed, sudden installation of python software, or PowerSploit module on your system, that could be an early alarm that something suspicious is going on your servers.

Finding Interesting Data

So now the potential attacker know where the data on our hypothetical server “ live”. The next step is narrowing the data down on “interesting”. There could be huge amounts of files in even the smallest organizations. How can attacker know which data is one he/she need.

With PowerSploit, functionality used is called Invoke-FileFinder.  It has a lot of filtering options, to narrow down data to “interesting”, and export it to CSV files, which allows attacker to explore it on his own system with wanted pace, and after detecting it, attacker can make a targeted attack, and get needed files to staging area, and transport them out of the network ( via FTP, or even Dropbox trial account).

The same thing happens with SmbMap. Just as PowerSploit, it will filter out the data with options, the tool can provide, and show the data, the attacker is interested in, with the same outcome, getting pieces of information.

Protection

With this example, a hypothetical attack is in the second phase. The attacker, successfully listed files and found the most interesting ones. The easy part is left undone. Just taking the data. How to protect from that? Together with earlier mentioned methods, the following can help administrator fortify system and files.

Password rotation – Can be very important action, especially for services and applications that store passwords in filesystems. Constantly rotating passwords and checking file content can present a very large obstacle for the attacker, and will make your system more secure.

Tagging, and encryption –  In combination with Data Loss Protection, will highlight and encrypt important data, which will stop simple type of attacks, at least, getting important data.

Persistence

The final part of the file system attack. In the hypothetic scenario, we had listed and accessing data on the penetrated system. And here we will describe how attackers persist in the system, even when they get kicked out the first time.

Attackers hide some of their data into the NTFS file system, more accurate, in Alternate Data Stream ( ADS). Data of a file is stored in $DATA attribute of that file as NTFS tracks it. Malware vendors, and “bad guys” are tracking ADS and use it for entrance, but still, they need credentials.

So as usual, they can be stopped by correct permissions usage, and not allowing “write” permission to any account that is not specifically assigned for write operations.

File System Attacks are tricky, but they are leaving traces, and in general, most of the attacks should be prevented by System Administrator behavior and predictions. In this field, we can fully say: it’s better to prevent than to heal, and it is clear that only knowing your system fully, and full-time administration and monitoring will/can make your system safe.

Do you want to avoid Unwanted File System Attacks on Microsoft Windows Server?

Protect yourself and your clients against security leaks and get your free trial of the easiest and fastest NTFS Permission Reporter now!

Introduction to Data Deduplication on Windows Server 2016

Data Deduplication is a Microsoft Windows Server feature, initially introduced in Windows Server 2012 edition. 

As a simple definition, we can tell, data deduplication is an elimination of redundant data in data set and storing only one copy of the same data. It is done by identifying double byte patterns through data analysis, removing double data and replacing it with reference pointed to stored, single piece of data. 

In 2017, according to IBM, an output of world data creation was 2.5 quintillions (1018) bytes a day. That fact shows that today’s servers handle huge portions of data in every aspect of human life. 

Definitely, some percentage drops on duplicated data in any form, and that data is nothing more than the unnecessary load on servers. 

Microsoft knew the trends, way back in 2012 when Data deduplication was introduced and kept developing it, so in Windows Server 2016 system, Data deduplication is more advanced, as more important. 

But let’s start with 2012, and understand the feature in its basic. 

Data Deduplication Characteristics: 

Usage –  Data deduplication is very easy to use. It can be enabled on a data volume in “one-click”, with no delays or impacts on a system functionality.  In simple words, if the user requests a file, he will get it, as usual, no matter is that file affected by deduplication process. 

Deduplication is made not to aim to all files. For example, files smaller than 32KB, encrypted files ( encrypted with a usage of EFS), and files that have Extended attributes, will not be affected by the deduplication process. 

If files have an alternate data stream, the only primary stream will be affected, but alternate, will not.  

Deduplication can be used on Primary data volumes without affecting files that are being written to until files get to certain age, which allows great performance of feature active files and saves on other files. It sorts files in categories by criteria, and those that are categorized as “in policy” files are affected with deduplication, while others are not. 

Deduplication does not change write-path of new files. It allows writing of new files directly to NTFS and evaluates them later through background monitoring process. 

When files get to a  certain age, MinimumFileAgeDays setting decides ( previously set up by admin), are the files eligible for deduplication. The default setting is 5 days, but it can be changed, to a minimum of 0 days, which processes it, no matter of age. 

Some file types can be excluded, like PNG or CAB file types, with compression, if it is decided, the system will not benefit much from mentioned file type processing. 

In need of backing up and restoring to another server, deduplication will not make problems. All settings are maintained on the volume, and in need of relocation, they will be relocated too, all except scheduled settings, that are not written on volume. If relocation is made to a server that does not use deduplication, a user will not be able to access files affected by the process. 

Resource Control 

The feature is made to follow server workload and adapt to system resources. Servers usually have roles to fill, and storage, as seen by admin is only necessary to store background data, so deduplication is adapting to that philosophy. If there are resources to deduplicate, the process will run, if not, the process will stand by and wait for resources to become available. 

A feature is designed to use low resources and reduce the Input/output operations per second ( IOPS) so it can scale large data and improve the performance, with index footprint of only 6 bytes of RAM per chunk (average size of 64 KB) and temporary partitioning.  

– As mentioned, deduplication works on “chunks” principle, it uses an algorithm with chunks a     file in a 64KB pieces, compresses it, and store in a hidden folder. If a user requests that file, it “regenerate” file from the pieces and serve it to the user. 

–  BranchCache:  the feature that sub-file chunking and indexing engine are shared with. It has an option to send, if needed,  already indexed chunk over the WAN to the branch office, and saves a lot of time and data. 

Is there a  Fragmentation, and what about data access? 

The question that is imposed when reading about deduplication, is fragmentation!? 

Is there a fragmentation on a hard drive, based on spreading chunks around your hard drive? 

Answer is no, deduplication ’s filter driver has a task to keep the sequence of unique chunks together on disk locality, so distribution doesn’t go randomly, plus, deduplication has its own cache, so in situation of multiple requests for a file in an organization, the access pattern will speed things up, and will not start multiple file “recovery” processes, and user will have the same “answer time” as with file without deduplication, and in need of copying one large file, we see end-to-end copy times that can be 1.5 times what it takes on a non-deduplicated volume. But real quality and savings are coming up when copying multiple large files at the same time. The time of copying, due to the cache can speed up to an amazing 30%. 

Deduplication Risks and solutions 

Of course, like all other features, this way of works has some risks. 

In cases of any type of data corruption, there are serious risks, but solutions too. 

There is possibility with errors caused by  disk anomalies, controller errors, firmware bugs or environmental factors, like radiation or disk vibrations, that chunks errors can cause major problems as multiple files loss., but with good admin organization, usage of backup tools,  on time corruption detection, redundancy copies and regular checkups can minimize risks of corrupted data, and loses. 

Deduplication in Windows Server 2016 

As with all other features, data deduplication went through some upgrades and new features in the latest edition of Microsoft Server. 

We will describe the most important ones, and show a way to enable and configure that feature in Microsoft Server 2016 environment. 

Multithreading  

Multithreading is flagged as a most important change in 2016 when compared with Windows Server 2012 R2. On Server 2012 R2, deduplication operates in a single-threaded mode, and it uses one processor core by the single volume. In Microsoft, they saw it as a performance limit, and in 2016, they introduced multi-threaded mode. Now each volume uses multiple threads and an I/O queues. It changed limits of size per file or volume. In Server 2012 R2, maximum volume size was 10 TB, and in 2016 edition, it changed to 64TB volumes, and 1 TB files, what represents a huge breakthrough. 

Virtualization Support 

In the first edition of deduplication feature ( Microsoft Windows Server 2012), there was a single type of deduplication, created only for standard file servers, with no support for constantly running VM’s. 

Windows Server 2012 R2 started using   Volume Shadow Copy Service (VSS)  in a way that deduplication with a usage of optimization jobs, optimizes data, and VSS captures and copies stable volume images for backup on running server systems. With the usage of VSS, Microsoft, in 2012 R2 system, introduced virtual machines deduplication support and a separate type of deduplication. 

Windows Server 2016, went one step further and introduced another type of deduplication, designed specifically for virtual backup servers (DPM). 

Nano server support  

Nano server is minimal component’s fully operational Windows Server 2016, similar to Windows Server Core editions, but smaller, and without GUI support, ideal for purpose-built, cloud-based apps, infrastructure services, or Virtual Clusters.  

Windows Server 2016, supports fully deduplication feature on that type of servers. 

Cluster OS Rolling Upgrade support 

Cluster OS Rolling upgrade is a Windows Server 2016 feature that allows upgrade of an operating system from Windows Server 2012 R2 cluster nodes to Windows Server 2016 without stopping Hyper V. It can be made by usage of so-called “mix mode” operation of the cluster. From deduplication angle, that means that same data can be located at nodes with different versions of deduplication. Windows Server 2016, supports mix mode and provides deduplicated data access while a process of cluster upgrade is ongoing. 

Installation and Setup of Data Deduplication on Windows Server 2016 

In this section, we will bring an overview of best practice installation and set up data deduplication on Windows Server 2016 system. 

As usual, everything starts with a role. 

In server manager, choose, Data deduplication ( Located in the drop-down menu of File and storage services), or with the usage of PowerShell cmdlet (as administrator) :  

Install-WindowsFeature -Name FS-Data-Deduplication 

Enabling And Configuring Data Deduplication on Windows Server 2016 

For Gui systems, deduplication can be enabled from Server manager – File and Storage services – Volumes, selection of volume, then right-click and Configure Data Deduplication. 

After selecting the wanted type of deduplication, it is possible to specify types of files or folders that will not be affected by the process. 

After it is needed to setup schedule, with a click on Set Deduplication Schedule button, which will allow selection of days, weeks, start time, and duration. 

Through PowerShell terminal, deduplication can be enabled with following command ( E: is an example volume letter) : 

Enable-DedupVolume -Name E:  -UsageType HyperV 

Jobs Can be listed with the command : 

Get-DedupSchedule 

And scheduled with following command (example – Garbage collection job) : 

Set-DedupSchedule -Name “OffHoursGC” -Type GarbageCollection -Start 08:00 -DurationHours 5 -Days Sunday -Priority Normal 

These are only basics of deduplication  PowerShell commands, it has a lot more different deduplication -specific cmdlets, and they can be found at the following link : 

 https://docs.microsoft.com/en-us/powershell/module/deduplication/?view=win10-ps 

Do you want to avoid Data Lost and Unwanted Data Access?

Protect yourself and your clients against security leaks and get your free trial of the easiest and fastest NTFS Permission Reporter now!

How to Configure NFS in Windows Server 2016

NFS  (Network File System) is a client-server filesystem that allows users to access files across a network and handle them as if they are located in a local file directory. It is developed by  Sun Microsystems, Inc, and it is common for Linux/ Unix systems. 

Since Windows Server 2012 R2, it is possible to configure it on Windows Server as a role and use it with Windows or Linux machines as clients. Read to know about How to Configure NFS in Windows Server 2016 here.

How to install NFS to Windows Server 2016 

Installation of NFS (Network File System) role is no different than an installation of any other role. It goes from “Add roles and features Wizard”. 

With few clicks on  “Select server roles” page, under File and Storage Services, and expansion of File and iSCSI Services, the system will show checkbox “Server for NFS”. Installation of that role will enable NFS server. 

The configuration of NFS on Windows Server 2016 

After installation, it is needed to configure role properly. The first stage is choosing or creating a folder for NFS (Network File System) share. 

With right click and properties option, the system will bring the NFS Sharing tab, and Manage NFS sharing button, as part of the tab. 

It will provide  NFS Advanced Sharing dialogue box, with authentication and mapping options, as well as with “Permissions” button. 

Clicking on “Permissions” button will open Type of access drop-down list, with the possibility of root user access, and permission level. 

By default, any client can access the NFS shared folder, but it is possible to control or limit the specific clients, with a clicking of Add button and type the client’s IP address or hostname. 

 Mount NFS Shared Folder on Windows Client 

The steps above make NFS (Network File System) server ready for work.  

To successfully test it, it is needed to mount chosen NFS folder on a Linux or Windows client with following steps: 

  1. It is needed to activate a feature on the client, by clicking Control Panel / Programs and Features / Services for NFS / Client for NFS
  2. After installing the service, it is needed to mount the folder with the following command :
mount –o \\<NFS-Server-IP>\<NFS-Shared-Folder> <Drive Letter>: 

 The command maps folder as drive and assigns chosen letter to it. 

Mount NFS Shared Folder on Linux Client  

No matter NFS is common to Linux / Unix systems, it is still needed to mount folder to a system via command, similar to windows systems. 

mount –t NFS <NFS-Server-IP>/<NFS-Shared-Folder> /<Mount-Point> 


Do you have unclear NTFS Permissions assignments?
Do you have too many special permissions set on your fileservers?
Or blocked NTFS Permission Inheritance?

Protect yourself and your clients against security leaks and get your free trial of the easiest and fastest NTFS Permission Reporter now!

Windows Server Storage Reports Managements

Storage Reports Management

Storage Reports is a node on the file server management console that enables system administrators to schedule periodic storage reports that allow the identification of trends in disk usage, look out for any attempts made to save unauthorized files, and generate random reports on demand.

The following are the four ways in which you can use Storage Reports:

  1. Scheduling a report on a particular day and specific time to generate a list of recently accessed files. Information from these files can help in monitoring weekly storage activities and help in planning on a suitable day to put the server on a downtime for maintenance
  2. The report can be used at any given time to identify duplicate files in storage volumes of a particular server. Removing duplicate copies frees up more space.
  3. A customized file by group report can be used to identify how volumes are distributed across different file groups
  4. Run individual file reports to understand how users use shared resources on the network

The article will explore:

  • Setting a report schedule
  • Generating on-demand reports

Setting a Report Schedule

A regular report schedule is done via a report task which specifies the kind of report to be generated and what parameters to use. The parameters are the volume and folder used for reporting, the frequency of report generation, and the file format used. By default, all scheduled reports will be saved using the default parameters. They can also be configured in File Server Resource Manager options. There is also an option of using E-Mails to send reports to several Administrators.

When setting up a reporting schedule, it is critical to configure the report to gather as much information as possible on a single schedule to reduce the impact likely to affect server performance. This can be achieved by using the Add or Remove Reports for a Report Task action. The process gives room for editing or adding different report parameters. Changing the schedules or delivery address, one must edit the report tasks individually.

Scheduling a Report Task

  1. Click on Storage Reports Management Console
  2. Right click on Storage Reports Management and click Schedule a New Report Task (alternatively, you can select Schedule a New Report Task from the Actions panel). You should now be seeing the Storage Reports Task Properties dialog box
  3. The following steps are taken when selecting the folder and volume to be used:
    • Click Add found under Scope
    • Browse to the volume or folder that you want to use and click OK to add it as one of the paths.
    • You can add many volumes as necessary (Removing a volume is by clicking on the path and click Remove
  4. Specifying Storage Report type:
    • Under Report Data, choose all the reports that should be included. All reports generated for a scheduled report task are included

Editing the report parameters:

  • Click on the report label and click Edit Parameters
  • In the Report Parameters dialog box, enter the parameter values and then click OK
  • Use the Review Selected Reports to see a list of all parameters for a particular report
  • Click close
  1. Storage Reports Saving Format:
    • Under Report formats, select one of the formats to be used for scheduled reports. All reports use the Dynamic HTML. Other formats include XML, HTML, CSV, and TEXT.
  2. Setting up the E-mail for delivery:
    • On the Delivery tab, select Send Reports to the Following Administrators check box. Enter the name of the account to receive the reports.
    • The email format should be account@domain. Use semicolons to separate multiple email addresses
  3. Report Scheduling:

On the Schedule tab, click on Create Schedule and then click New. The default time is set at 9.00 am, which can be modified.

  • To specify the reporting frequency, select an interval by picking from the Schedule Task drop-down list. Reports can be generated at once or using periodic timelines. A report can also be generated at system startup or when the server has been idle for some time.
  • Additional scheduling information can be modified in Schedule Task options. The options can be changed depending on the intervals chosen.
  • To specify time, you can type or select the value in the Start time box
  • Advanced options give access to more scheduling options
  1. Save the schedule by clicking OK

Storage Report tasks are added to the Storage Reports Management node and are identified by report type and schedule.

Generating On-Demand Reports

On Demand Storage Reports are obtained by using the Generate Reports Now option. On-demand, reports are used to analyze disk usage on the server.  On-demand, Storage Reports are also saved in their default location.

Generate Reports Immediately

  1. Click on Storage Reports Management node
  2. Right click on Storage Reports Management and then click on Generate Reports Now (Alternatively, choose Generate Reports Now from the Actions panel) to open the Storage Reports Task Properties dialog box
  3. Selecting the volumes and folders to use:
    • Under Scope click on Add
    • Browse the folders and select by clicking on the desired folder and click OK.
  4. To specify the nature of the report:
    • Under Report Data, select the report(s) you want to be included

Editing report parameters:

  • Click on the report label and click on Edit Parameters
  • In Report Parameters, you can edit the parameters as needed, then click OK
  • You can view a list of selected parameters by clicking on Review Selected Reports, then click
  1. Specify saving format:
    • Under Report Formats, you can choose to use the default Dynamic HTML or use the CSV, XML, HTML, and TEXT formats.
  2. Using an E-mail address to send Storage Reports:
    • On the Delivery tab select, the option Send reports to the following administrators. Then enter the administrative account by using the format account@domain. Remember to use a semicolon when adding more than one account.
  3. To get all the data and generate reports, click OK to open the Generate Storage Reports dialog box.
  4. Choose how you want to generate on-demand reports:
    • You can view the reports immediately or wait for the entire report to be generated before being displayed.
    • To view reports later, click on Generate Reports in the background.

Conclusion

All Storage Reports tasks are added to the Storage Reports Management node. They can be viewed by their status, the last run time, and the output of every run, and the next scheduled run time.

Prevent Unauthorized Access to Windows Server Storage Reports!

Get your free edition of the easiest and fastest NTFS Permission Reporter now!

Storage Replication in Windows Server 2016

Storage Replica is a new Windows Server technology feature on Windows Server 2016. This facilitates the replication of volumes between clusters for discovery or servers. It also allows the users to craft stretch failover clusters which span at least two sites, and with all the nodes kept in sync.

Note: This feature is only available in the Datacenter edition of Windows Server 2016.

Storage Replica reinforces asynchronous and synchronous replications.

  • Asynchronous replication mirrors the data across sites which lie beyond metropolitan ranges over the network links which have higher latencies, minus any guarantee that both sites have any identical copies of data by the instance of failure.
  • Synchronous replication has the duty of reflecting the data within the low-latency network site which have crash-consistent volumes to make certain that there is zero data loss at the file-system level amid the failure.

Why You Need Storage Replication

The storage replica is an ideal tool for the modern requirement for disaster recovery alongside the preparedness abilities in Windows Server 2016 Datacenter Edition. The Windows Server, for the first time, offers the users with a peace of mind of no data loss, an ability to synchronously safeguard data on various floors, racks, building, cities, counties, and campuses.

After a disaster strikes, the data will be accessible elsewhere without any data loss. The same principle applies prior to the striking of the disaster; the storage replica allows the users to switch workloads to much safer locations before catastrophes are served with a few moments warning (again, without any data loss).

The storage replica is also reliable as it reinforces the asynchronous replication for extended ranges and networks of higher latency. Since it is not a check-point, the delta of adjustments will be somehow much lower as compared to the snapshot-based outputs. Again, the storage replica mainly operates at the partition layer, and is therefore able to replicate all VSS snapshots modelled by the Windows Server and backup software. This permits the application of unstructured operator data synchronously replicated.

The storage replica can also permit users to decommission the existing file replication systems like DFS replication which were pressed into the duty as the low-end disaster recovery remedy. The DFS replication works quite perfectly over very low bandwidth networks, though its latency is relatively higher most of the time. This is majorly contributed by its need for files to close and also its artificial throttles which are meant to eradicate the network congestion.

Supported Configurations

The Stretch Cluster allows the users to configure storage and computer in one cluster, where other nodes share a set of symmetric storage whole, some nodes share the other, and then asynchronously or synchronously replicate with the site awareness. This instance can leverage storage spaces with the shared SAN, SAS Storage and ISCSI-attached LUNs. It is regulated with the PowerShel and Failover manager graphical gadget, and permits for the automated failover.

Cluster to Cluster permits the replication in between two separate clusters, where a single cluster asynchronously or synchronously replicates with another cluster. Ideally, the instance can permit the utilization of storage spaces directly, SAN and ISCSI-attached LUNs and Storage Spaces with shared SAS storage. It is naturally managed by the PowerShell and demands manual intervention for the failover. There is an inclusion of support for Azure Site recovery of this instance.

Server to Server permits both asynchronous and synchronous replication between at least two standalone servers leveraging the Storage Spaces with the shared SAS storage, ISCSI-attached LUNs and SAN. This is also managed by the PowerShell, alongside the server manager tool and demands a manual intervention for the failover.

The Key Features of Storage Replication

Simple Management and Deployment
The storage replica has a model mandate for an ease of use. The crafting of the replication affiliation between two servers demands only one PowerShell command. The deployment stretch clusters leverages the intuitive wizard in the Failover Cluster Manager gadget.

Host and Guest
All abilities of Storage Replica are in both virtualized guest and host-based deployments. This implies that the guests are able to replicate their data volumes if running on non-Windows virtualization platforms even in public clouds, so long as Windows Server 2016 Datacenter Edition in the guest is utilized.

Block-Level Replication, Zero Data Loss
With the help of synchronous replication, there is zero possibility of any data being lost. With the block-level replication, there is no probability of any file getting blocked.

User Delegation
The operators can delegate the permissions to manage the replication without being an affiliate of the built-in Administrators team on the replicated modes, hence reducing their access to the unrelated sections.

Network Constraint
The storage replica can at times be limited to the individual networks server and by the replicated volumes, with the aim of providing backup, application, and management software bandwidth.

High Performance Initial Sync
The storage replica reinforces the seeded initial sync, where there is already a subset of data on a target from the initial backups, copies, or shipped rives. The initial application can only copy the differing blocks, possibly reducing the initial sync time and regulating data with an aim of preventing the data from utilizing the limited bandwidth.

Use of SMB 3 as the transport protocol which is also supported via the TCP/IP model.

Prerequisites

  1. Two servers with two volumes on each server or location. One location will be for storage of data and the other for storage of logs.
  2. Volumes need to be of the same size both at the main server and remote server.
  3. Log volumes should also be of identical sizes across the two volumes.
  4. Data volumes should not exceed 10TB and should be of NTF
  5. Both servers need to be running Windows Server 2016.
  6. There must be at least 2GB of RAM alongside two cores for every server.
  7. There must be one TCP/Ethernet connection on each of the server for synchronized replication, but most preferably RDMA.
  8. The network between the servers with a reliable amount of bandwidth to accommodate the user’s IO write workload and an average of 5ms round-trip latency for an effective synchronous replication.

How it Works

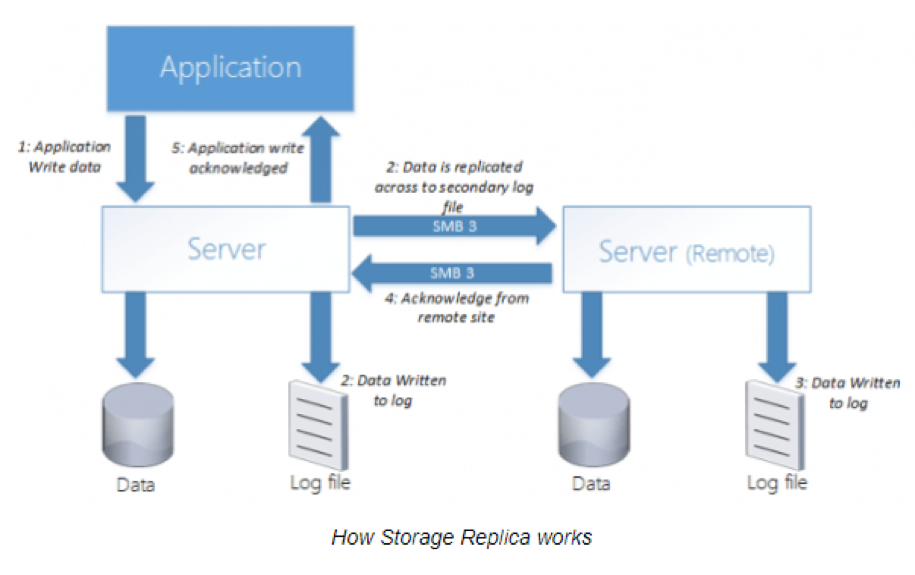
The above diagram depicts how storage replication works in synchronous configuration.

The application will write data onto the File System volume labelled Data. This will be intercepted by I/O (input/output) filtering and be written onto the Log Volume located on the same server. This data will then be replicated across to the remote server’s log volume. When this data is written on the log volume, an acknowledgement is sent back to the primary server and to the application. On the remote server, data will be flushed from the Logs volume to the Data volume.

Note: The purpose of the Log Volume is to record and verify all the changes that occur across both blocks. Furthermore, in synchronous model configuration, the primary server needs to await acknowledgement from the remote server. If network latency is high, this will lead to a degraded network and slow down the replication process. Consider using RDMA which has a low network latency.

In asynchronous replication model, data would be written to the Log Volume located on the main server and thereafter, an acknowledgement sent to the application. Data would then be replicated from the Log Volume on the primary server to the Log Volume on the remote server. Should the link deteriorate between the two servers, the primary server will block all changes until the link is restored whereupon replication of changes will continue.

Setting Up Storage Replication

  1. Import-module StorageReplica
    Launch Windows PowerShell and verify the presence of Storage Replica Module.
  2. Test-SRTopology -SourcheComputerName CHA-SERVER1 -SourceVolumeName f: -SourceLogVolumeName e: -DestinationComputerName CHA-SERVER2 -DestinationVolumeName f: -DestinationLogVolumeName e: -DurationInMinutes 30 -ResultPath c:\temp
    Test the storage replica Volume by running the command above.
  3. PowerShell will then generate an HTML report that will give an overview of the requirements met.
  4. NewSRPartnership -SourceComputerName CHA-SERVER1 -SourceRGName SERVER1 -SourceVolumeName e: -SourceLogVolumeName f: -DestinationComputerName CHA-SERVER2 –DestinationRGName SERVER2 –DestinationVolumeName e: -DestinationLogVolumeName f:
    Begin setting up the replication configuration using the command above.
  5. Set-SRPartnership –ReplicationMode Asynchronous.
    Run Get-SRgroup to generate a list of configuration properties. It is set to run on synchronous replication by default & Log file set to 8GB. This can be set to asynchronous using the command above.

When we head out to the remote server and open File Explorer, Local Disk E will be inaccessible, while Logs will be stored on Volume F.

When data is written on the source server, it will be replicated block by block to the destination or remote server.


Prevent Unauthorized Access to Sensitive Windows Folders!

  • No more unauthorized access to sensitive data
  • No more unclear permission assignments
  • No more unsafe data
  • No more security leaks

Get your free trial of the easiest and fastest NTFS Permission Reporter now!

Overview: Resilient File System (ReFS)

Resilient File System (ReFS) is Microsoft’s latest file system that is an alternative to the New Technology File System (NTFS). ReFS has been introduced for implantation of systems with large data sets to give more functionality in terms of efficiency, scalability, and availability.

An outstanding feature of ReFS is data integrity which protects data from common errors that may lead to data loss. In case of an error in the file system, ReFS has the ability to recover from data loss without compromising the volume availability. On the other hand, ReFS is a robust file system with proven reliability and it is time and cost efficient when used on servers.

The Key Elements of ReFS

The key elements of a Resilient File System are dependent on the amount of data the server system manages.

  • Allocate on Write
    The main reason behind this feature is to avoid data corruption because of its ability to provide cloning of course database simultaneously without straining available storage space. All forms of torn writes are eliminated using the Allocate on Write method. This implies that the file stored on ReFS partition can be read and written on a single instruction.
  • B+ Trees
    The servers store a lot of information and limitless sizes of files and folders. The ReFS scalability element means that the file servers can handle large data sets efficiently. A B+ Tree file structure also enables data to be stored and retrieved in a tree structure with every node acting as keys and pointers to low level nodes in the same tree.

Why Use Resilient File System

  • Resilience
    From its name, the ReFS partition will automatically detect and fix detected errors while the file is in use without compromising file in integrity and availability. Resiliency relies on the following four factors:

    • Integrity Streams
      Integrity streams allow for the use of checksums on stored data enabling the partition to query the reliability and consistency of the file. Fault tolerance and redundancy is maintained through data striping. Power shell commands such as Get-FileIntegrity and Set-FileIntegrity can be used to manage file integrity streams.
    • Storage Space Integration
      ReFS allow for repair of data files with an alternate copy found in the storage space. This is made possible when used alongside disk mirroring. The repair and replacement takes place online without the need to unmount the volume.
    • Data Recovery
      When data is corrupted and no original copy of it exists in the database, ReFS will remove the corrupt data from the namespace while keeping the volume online.
    • Preventive Error Correction
      The Resilient File System allows for data integrity check in addition to validation before any read or write action. The integrity check will occasionally scan through volumes to identify potential errors and trigger a repair action.
  • Compatibility
    Working with ReFS can be used alongside volumes using the New Technology File System (NTFS) because it still has support for key NTFS features.
  • Time Saver
    When backing up data or transferring files from partitions using ReFS, the time taken during read/write actions is reduced compared to backing up data in an NTFS partition.
  • Performance
    ReFS performance ranks on new features like virtualization, cloning volume blocks, real time optimization, etc. All are to enhance dynamic and multiple workloads. Performance on any ReFS is made possible through:

    • Mirror Accelerated Parity
      The parity mode ensures that the system delivers both efficient data storage and high performance. The volume is divided into two logical storage sectors, each with its own drive properties and resilient types.
    • Accelerated VM Operations
      In an effort to improve functionality when implementing virtualization, ReFS allow for the creation of partitions that support block cloning to allow for multi-tasking. ReFS also reduces the time needed to create new fixed-size Virtual
      Hard Disk files from minutes to seconds.
    • Varied Cluster Sizes
      The ReFS allows for the creation of both 4K and 64K file cluster sizes. In other file systems, 4K is the recommended cluster size. But the ReFS accommodate the 64K because of its large and sequential input /output file requests.
    • Scalability
      The ability to support large data sets without having a negative impact on system performance is by far the best file deployment system in terms of scalability. Shared data storage pools across the network enhance fault tolerance and load balancing.

Points to Note

ReFS cannot be used on a boot file system (the drive containing bootable Windows files). The ReFS partition is best used exclusively on storage volumes.

Removable volumes such as USB flash drives cannot accommodate the ReFS partition because there is no available mechanism to convert a ReFS partition to another file system.

ReFS, like NTFS, was built on the foundation of compatibility to make it easier to move data from NTFS to ReFS because of the inherited features like access control list, BitLocker, mount points, junction points, volume snapshots, symbolic links, and file IDs.

Some of the lost features likely to be encountered when moving to ReFS are Object IDs, short names, extended IDs, compressions, quotas, hard links, user data transactions, and file level encryption.

Some files or installed programs may not function as intended when ReFS is used on a non-server operating system.

In the even that a ReFS partition fails, recovering the partition is not possible; all that can be done is data recovery. Presently, there is no recovery tool available for ReFS.

Conclusion

The Resilient File System has unique advantages over the existing file system. It may have its own drawbacks, but that does not take away its self-healing power, file repairs without downtimes, resilience in the event of power failure, and its ability to accept huge file sizes and names longer that then usual 255 characters. File access on ReFS uses the same mechanisms NTFS uses.

Most of the implementations of ReFS are to be used on systems with huge storage and rapid input/output demands. The ReFS cannot fully replace the NTFS because its design was intended for a specific work environment. Some of its features do not have full support, therefore system administrators aspiring to use ReFS may still have to wait for its full implementation.

Enforcing NTFS Permissions on A File Share

One of the most important functionalities in Microsoft Windows Server is access control over files and folders. That important function is controlled by File and Folder security permissions framework.

NTFS (New Technology File System) permissions are usable to drives formatted with NTFS. NTFS permissions affect local users as well as network users and they are based on the permission granted to each user at system login, no matter where the user is connecting.

NTFS Structure

NTFS File System is a hierarchical structure, with disk volume on top and folders as branches. Each folder can contain numerous files or folders, as leaves in that node. Folders are referred as containers or objects that contain other objects.

In that hierarchy, of course, there is need to define access rights and permission per user or group. For that, permissions are used.

Managing Permissions

Each permission that exists can be assigned in two ways: explicitly or by inheritance.

Permissions set by default when the object is created, or by user action are called. Explicit permissions and permissions that are given to an object because it is a child of a parent object is called inherited permissions.

Permissions are best managed for containers of objects. Objects within the containers inherit all the access permissions in that container. The first thing to specify when establishing permissions is granting access to the resource (Allow) or not (not Allow).

After setting up permission, resource assets are controlled by the Local Security Authority (LSASS), and it checks the security of user that tries to access it. If SID (security identifier) is valid, LSASS allows usage of an object and all inherited objects in the structure.

Permission Rules

Due to many different permission settings per user in a bigger structure, there is a possibility of conflicting permission settings. So here are some rules that were made to resolve possible issues:

  • Deny permissions are superior to allow
  • Permissions applied directly to an object (explicit permissions) are superior to permissions inherited from a parent (for example from a group).
  • Permissions inherited from near relatives are superior to permissions inherited from distant predecessors. So, permissions inherited from the object’s parent folder are superior to permissions inherited from the object’s “grandparent” folder, and so on.
  • Permissions from different user groups that are at the same level are cumulative. So, if a user is a member of two groups – one of which has an “allow” permission of “Read” and other has an “allow” or “Write”, the user will have both read and write permission depending on the other rules above.

Permission Hierarchy

File permissions are superior to folder permissions unless the Full Control permission has been granted to the folder.

Deny permissions generally are superior to allow permissions, it is not always the matter. An explicit “allow” permission can take precedence over an inherited “deny” permission. The hierarchy of precedence for the permissions can be set as follows, starting from higher to lower:

  1. Explicit Deny
  2. Explicit Allow
  3. Inherited Deny
  4. Inherited Allow

NTFS Permissions and Shared Folder Permissions

When NTFS permissions are used alongside Share permission, there could be a conflict in the configuration. In those cases, an option that is applied is one that is most restrictive.

It is possible to combine both permission sets to access the resources on an NTFS volume. First, it is needed to share folders with the default shared folder permission and then assigns NTFS permission to a shared folder and to secure files that way.

This way, an effect is the usage of NTFS permissions to control access to shared folders, and it is more secure and flexible than usage of shared folders permission only. Plus, NTFS permissions are enforced, regardless if the resource is accessed locally or via the network.

NTFS permissions can be applied to files and subfolders in a shared folder, and different permissions can be applied to each file and subfolder inside shared folder. That means that NTFS functionality is added to a shared folder.

So, in the hypothetical situation of moving or copying files or folders from NTFS permissions to a shared folder. The question is, is it possible to force files and folders to inherit permissions from the parent, regardless of how they get in a shared folder (copied or moved)?

The short answer is yes.

When files are copied or moved, all permissions are inherited from the destination. This makes things much easier to administer and gives users less chance to accidentally create file/folder structures with incorrect permissions without knowing.

File Server Resource Manager (FSRM) Overview

File Server Resource Manager (FSRM) is a Microsoft Windows Server role created for managing and classifying data stored on file servers. It includes some interesting features which can be configured by using the File Server Resource Manager snap-in or by using Windows PowerShell.

Here’s an overview of the features included in the FSRM.

File Classification Infrastructure

This offers automatic classification process based on custom properties with the purpose of an easier and a more effective way of managing files.

It classifies files and applies policies based on that classification. Once files are classified, a management task can be either public or private. As an example, we can take public or private file classification. Once the files have set class, a management task can be created to perform some actions on a file (RMS encryption for example).

It can be instructed to perform encryption on files classified as private but exclude files classified as public.

File Management Task

Enables applying of conditional policy or action to files based on classification. Conditions of the policies can include file location, classification properties, file creation date, file modification date, or date of last access to file.

The tasks that can be managed are ability to expire files, encrypt files, or run some custom command.

Quota Management

This allows a limitation of allowed space for a volume or folder. Quotas are automatically applied to new folders that are created on a volume. It is possible to define quota templates which can be applied to new volumes or folders.

File Screening Management

This provides control over the type of files that can be stored on a server. For example, the user can create file screen which does not allow storing JPEG files in the personal shared folder on a file server.

Storage Reports

Storage reports are used to help identify trends in disk usage and classification of user data. It can monitor selected groups of users and restrict attempts to save unauthorized files.

Important thing to notice is that File Server Resource Manager supports only NTFS File System format and does not support the Resilient File System (ReFS).

Practical Applications

Some practical applications for File Server Resource Manager include:

  • If File Classification Infrastructure is used with the Dynamic Access Control, a policy that grants access to files and folders based on the way files are classified on the file server.
  • The user can create File Classification rule which tags any file that contains at least 10 Social Security numbers as personal pieces of the information file.
  • Any file that has not been modified in the last 10 years can be set as expired.
  • Quotas (i.e. 200 MB) can be created per user. A notification to the admin user can also be set when the quota is at 80% (i.e. 180 MB of 200).
  • It is possible to schedule a report which runs at the specific time weekly with a purpose of generating a list of most recently accessed files from a previously selected period. This can help the admin user determine the weekend storage activity and plan server downtime accordingly.

Storage on Windows Server 2016: An Overview

Windows Server 2016 Data Center brought interesting new and improved features in the field of virtual workload data centers (SDDC). 

SDDC stands for Software-Defined Data Center, which is defined as data centers with a virtualized infrastructure delivered as a service. Microsoft finds SDDC as a more flexible, cost-effective data center platform based on Hyper-V. It offers the possibility of moving entire operation models away from a physical data center. 

Software-Defined Storage

For virtualized workloads technology in Windows Server 2016 consist of 4 new and improved features: 

  • Storage spaces direct – A new Windows Server 2016 features an extended existing Windows Server SDS (Software-defined Storage). This enables the building of highly-available (HA) storage systems with local storage. HA storage systems are highly scalable and much cheaper than traditional SAN or NAS arrays. It simplifies procurator and deployment and offers higher efficiency and performance. 
  • Storage replica – This provides block-level replication between servers or clusters and is intended primarily for disaster prevention, such as the ability to restore service to an alternate data center with minimal downtime or data loss, or even to shift services to an alternate site. It supports two types of replication: synchronous (primarily used for high-end transactional applications that need instant failover if the primary node fails) and asynchronous (commits data to be replicated to memory or a disk-based journal which then copies the data in real-time or at scheduled intervals to replication targets). 
  • Storage Quality of Service (QoS) – A feature that provides central monitoring and managing of storage performance for virtual machines using Hyper-V and the Scale-Out File Server roles. In Windows Server 2016, QoS can be used to prevent all storage resources consumption of single VM. This also monitors performance details of all running virtual machines and the configuration of the Scale-Out File Server cluster from one place. Plus, it defines performance minimums and maximums for virtual machines and ensures that they are met. 
  • Data Deduplication – A feature that helps in reducing the impact of redundant data on storage costs. Data Deduplication optimizes free space on a volume by examining the data on the volume for duplication. Once identified, duplicated portions of the volume’s dataset are stored once and are (optionally) compressed for additional savings. 

 General Purpose File Servers

  • Work folders, which were first presented in Windows Server 2012 R2, allows users to synchronize folder across multiple devices. It can be compared to existing solutions such as Dropbox, but with a difference of using your file server as the repository and that it doesn’t rely on a service provider. This way of synchronization is convenient for companies because of its own infrastructure used as a server, and for users who can work on files with no limits to corporate PC or being online.  
  • Offline Files and Folder Redirection are features that when used together, redirect the path of local folders (such as the Documents folder) to a network location while caching the contents locally for increased speed and availability.  
  • Separate Folder Redirection enables users and admins to redirect the local folder to other (network) locations. It makes files available from any computer on the network. Offline files allow access to files, even when online, or in case of slow network. When working offline, files are retrieved from the Offline Files folder at local access speeds. 
  • Roaming Users Profiles redirects user profiles to a file share so that users receive the same operating system and application settings on multiple computers. 
  • DFS Namespaces enables a user access to group-shared folders from different servers to one logically structured namespace. It makes handling shared folders on multiple locations easier from one place. 
  • File Server Resource Manager (FSRM) is a feature set in the File and Storage Services server role which helps classify and manage stored data on file servers. It uses features to provide insight into your data by automating classification processes, to apply a conditional policy or action to files based on their classification, limit the space that is allowed for a volume or folder, control the types of files that user can store on a file server and provides reports on disk usage. 
  • iSCSI Target Server is a role service which automizes management tasks. This is useful in a network or diskless boots as it creates block and heterogeneous storages. It’s also useful for testing applications before deployment in storage area networks. 

File Systems and Protocols

  • NTFS and ReFS – A primarily new and a more resilient file system, which maximizes data availability, scaling, and integrity of large data sets across different workloads. 
  • SMB (Server Message Block) –  Provides access to files or other resources at a remote server. This allows applications to read, create, and update files on the remote server. It can also communicate with any server program that is set up to receive an SMB client request.  
  • Storage Class Memory – Provides performance similar to computer memory, but with the data persistence of normal storage drives. 
  • BitLocker – Protects data and system against offline attacks and stores data on volumes in an encrypted format. Even if the computer is tampered with or when the operating system is not running, this still provides protection. 
  • NFS (Network File System) – Provides a file sharing solution for enterprises that have heterogeneous environments that consist of both Windows and non-Windows computers. 

SDDC represents a diversity of traditional data centers where infrastructure is defined by hardware and devices. Components are based on network, storage, and server virtualization.