Storage on Windows Server 2016: An Overview

Windows Server 2016 Data Center brought interesting new and improved features in the field of virtual workload data centers (SDDC). 

SDDC stands for Software-Defined Data Center, which is defined as data centers with a virtualized infrastructure delivered as a service. Microsoft finds SDDC as a more flexible, cost-effective data center platform based on Hyper-V. It offers the possibility of moving entire operation models away from a physical data center. 

Software-Defined Storage

For virtualized workloads technology in Windows Server 2016 consist of 4 new and improved features: 

  • Storage spaces direct – A new Windows Server 2016 features an extended existing Windows Server SDS (Software-defined Storage). This enables the building of highly-available (HA) storage systems with local storage. HA storage systems are highly scalable and much cheaper than traditional SAN or NAS arrays. It simplifies procurator and deployment and offers higher efficiency and performance. 
  • Storage replica – This provides block-level replication between servers or clusters and is intended primarily for disaster prevention, such as the ability to restore service to an alternate data center with minimal downtime or data loss, or even to shift services to an alternate site. It supports two types of replication: synchronous (primarily used for high-end transactional applications that need instant failover if the primary node fails) and asynchronous (commits data to be replicated to memory or a disk-based journal which then copies the data in real-time or at scheduled intervals to replication targets). 
  • Storage Quality of Service (QoS) – A feature that provides central monitoring and managing of storage performance for virtual machines using Hyper-V and the Scale-Out File Server roles. In Windows Server 2016, QoS can be used to prevent all storage resources consumption of single VM. This also monitors performance details of all running virtual machines and the configuration of the Scale-Out File Server cluster from one place. Plus, it defines performance minimums and maximums for virtual machines and ensures that they are met. 
  • Data Deduplication – A feature that helps in reducing the impact of redundant data on storage costs. Data Deduplication optimizes free space on a volume by examining the data on the volume for duplication. Once identified, duplicated portions of the volume’s dataset are stored once and are (optionally) compressed for additional savings. 

 General Purpose File Servers

  • Work folders, which were first presented in Windows Server 2012 R2, allows users to synchronize folder across multiple devices. It can be compared to existing solutions such as Dropbox, but with a difference of using your file server as the repository and that it doesn’t rely on a service provider. This way of synchronization is convenient for companies because of its own infrastructure used as a server, and for users who can work on files with no limits to corporate PC or being online.  
  • Offline Files and Folder Redirection are features that when used together, redirect the path of local folders (such as the Documents folder) to a network location while caching the contents locally for increased speed and availability.  
  • Separate Folder Redirection enables users and admins to redirect the local folder to other (network) locations. It makes files available from any computer on the network. Offline files allow access to files, even when online, or in case of slow network. When working offline, files are retrieved from the Offline Files folder at local access speeds. 
  • Roaming Users Profiles redirects user profiles to a file share so that users receive the same operating system and application settings on multiple computers. 
  • DFS Namespaces enables a user access to group-shared folders from different servers to one logically structured namespace. It makes handling shared folders on multiple locations easier from one place. 
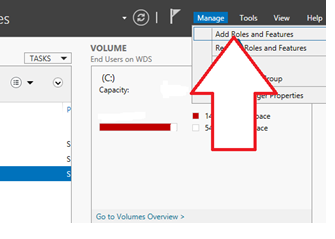
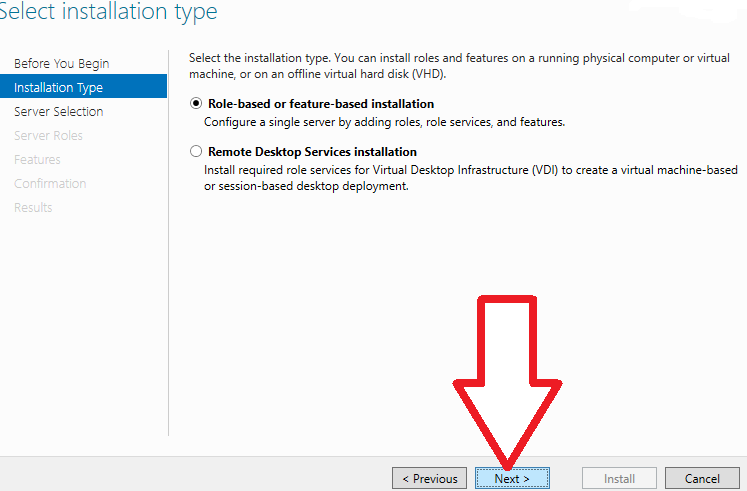
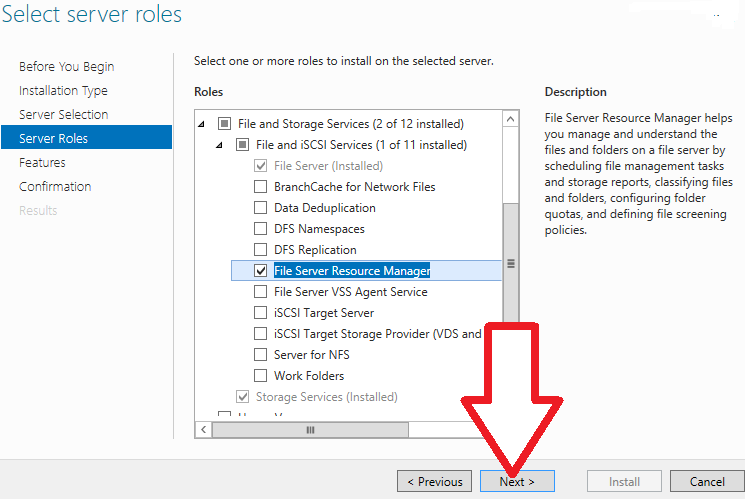
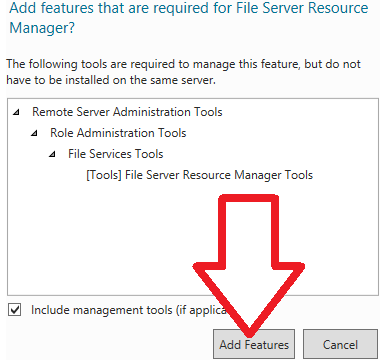
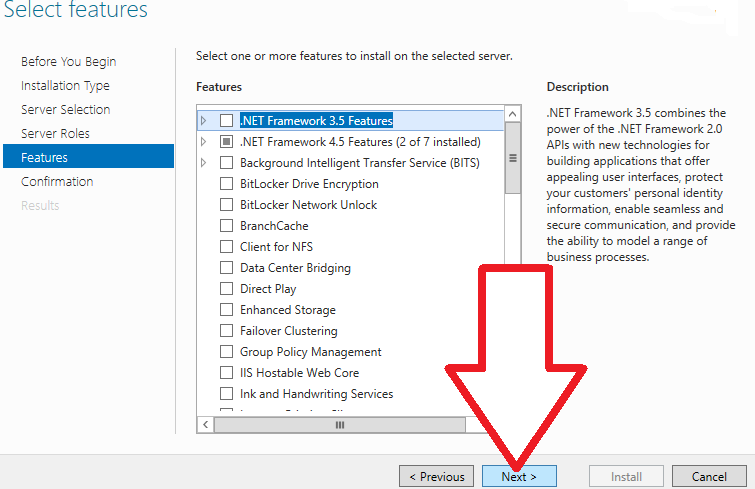
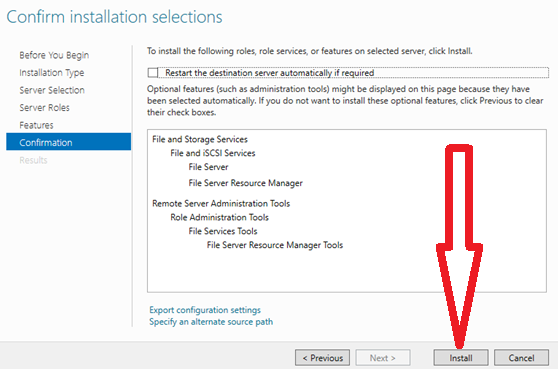
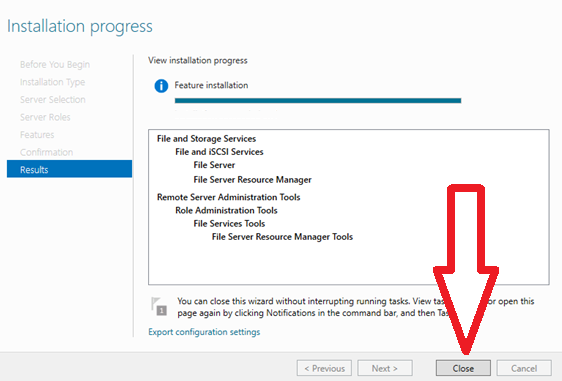
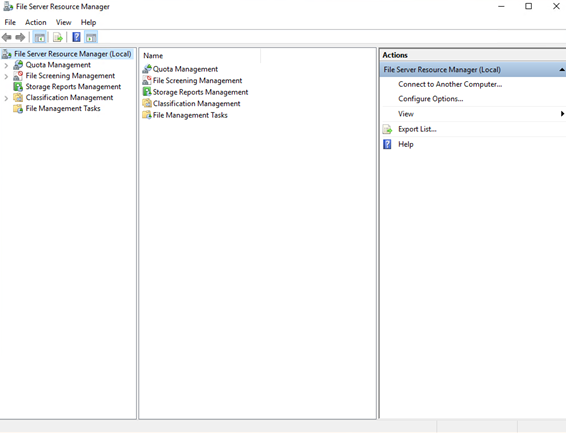
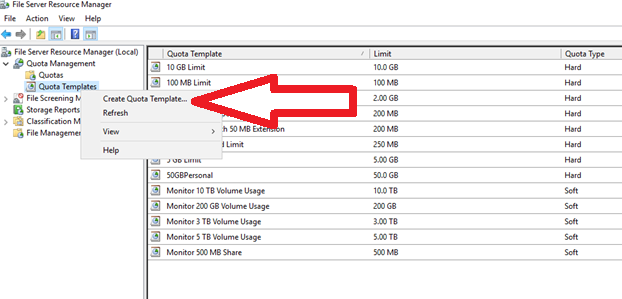
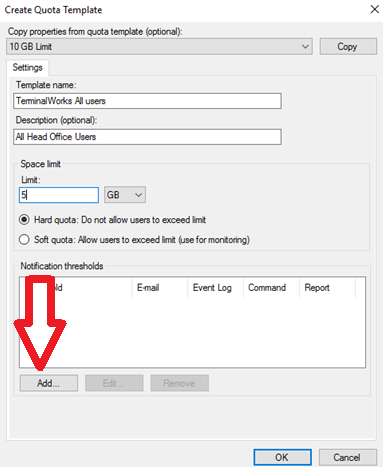
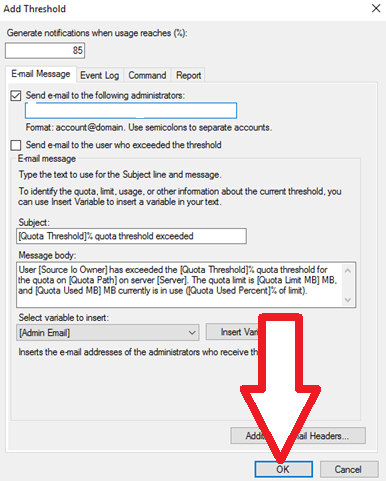
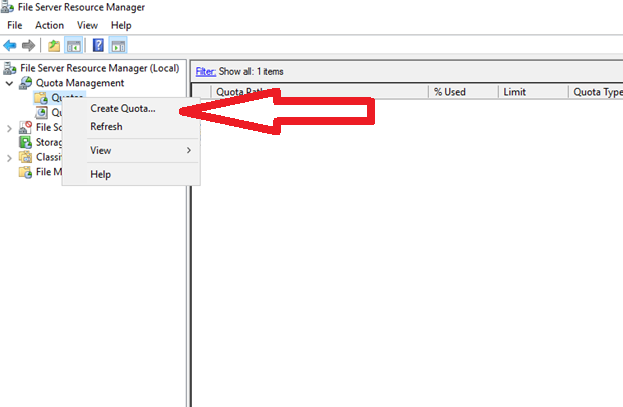
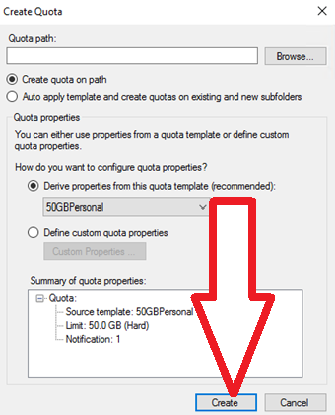
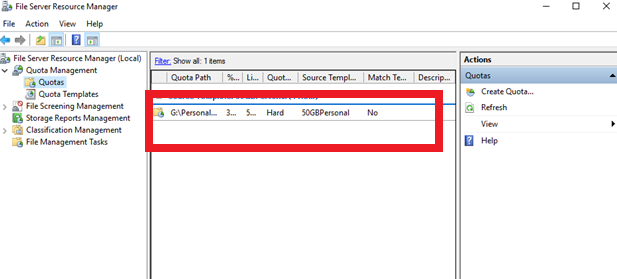
  • File Server Resource Manager (FSRM) is a feature set in the File and Storage Services server role which helps classify and manage stored data on file servers. It uses features to provide insight into your data by automating classification processes, to apply a conditional policy or action to files based on their classification, limit the space that is allowed for a volume or folder, control the types of files that user can store on a file server and provides reports on disk usage. 
  • iSCSI Target Server is a role service which automizes management tasks. This is useful in a network or diskless boots as it creates block and heterogeneous storages. It’s also useful for testing applications before deployment in storage area networks. 

File Systems and Protocols

  • NTFS and ReFS – A primarily new and a more resilient file system, which maximizes data availability, scaling, and integrity of large data sets across different workloads. 
  • SMB (Server Message Block) –  Provides access to files or other resources at a remote server. This allows applications to read, create, and update files on the remote server. It can also communicate with any server program that is set up to receive an SMB client request.  
  • Storage Class Memory – Provides performance similar to computer memory, but with the data persistence of normal storage drives. 
  • BitLocker – Protects data and system against offline attacks and stores data on volumes in an encrypted format. Even if the computer is tampered with or when the operating system is not running, this still provides protection. 
  • NFS (Network File System) – Provides a file sharing solution for enterprises that have heterogeneous environments that consist of both Windows and non-Windows computers. 

SDDC represents a diversity of traditional data centers where infrastructure is defined by hardware and devices. Components are based on network, storage, and server virtualization. 

Active Directory Federation Services in Windows Server 2016 

.When we look at IT businesses today, the most common spoken word is the “cloud”. Cloud computing made a huge impact in a way of functioning and business organization. 

But with more possibilities, usually we get more problems. And one of biggest challenges with doing business in the cloud is security and access control, especially in organizations with the need of extranet access. 

With that in mind, Microsoft has introduced an improvement to the Microsoft Windows Server 2016 system. 

Active Directory Federation Services  (ADFS)  

Active Directory Federation Services (ADFS) provides access control and single sign-in across a wide variety of applications like Office 365, cloud-based SaaS applications, and other applications on the corporate network. 

It enables organizations to provide a sign-in and access control to both modern and legacy applications — on-premises and in the cloud — with the unified set of credentials and policies. 

ADFS was first presented as an additional download in Windows Server 2003 R2 edition. But in the Windows Server 2016 edition, it became one of the most significant components of the system. 

ADFS 2016 has numerous improvements to offer. But the two most important ones are the three new options for signing in without using passwords and support for any LDAPv3 directory. 

Azure Multi-Factor Authentication  

The first option is the use of the Azure Multi-Factor Authentication (MFA) adapter for ADFS. Azure MFA can be configured for intranet or extranet, or as part of any access control policy. 

In the past, the Azure MFA server on premise was the only way of eliminating passwords as authentication methods. Now, with a configuration on the MFA adapter, the primary authentication method is the username and the OTP (One Time Password) code from the Azure Authenticator app. 

With MFA as the additional authentication method, the user provides primary authentication credentials (using Windows Integrated Authentication — username and password, smart card, or user/device certificate), then comes a prompt for text, voice, or OTP based Azure MFA login. 

 Access from Compliant Devices

ADFS 2016 upgraded device registration capabilities and enabled sign-on and access control based on the device compliance status. Sign-in is now possible with device credentials. And if/when device attributes change, compliance is re-evaluated, which brings certainty in enforcing policies. 

This can be allowed by enabling the following policies:  

  • Enable Access only from devices that are managed and/or compliant. 
  • Enable Extranet Access only from devices that are managed and/or compliant.  
  • Multi-factor authentication for computers that are neither managed nor compliant.

Windows Hello for Business  

The Windows Hello for Business (formerly known as Microsoft Passport for Work) feature can replace passwords with strong two-factor authentication that combines an enrolled device with a PIN or biometric (fingerprint or facial recognition) user input to sign in. ADFS 2016 supports this way of authentication and enables user sign-in on all ADFS applications without the need for a password. 

LDAPv3 Support  

Another improvement in ADFS 2016 is support for a combination of Active Directory and third-party directories. With the addition of ADFS support for authenticating users stored in LDAP v3-compliant directories, ADFS can now be used for:  

  • Third party, LDAP v3-compliant directories.
  • Active Directory forests where an Active Directory two-way trust is not configured. 
  • Active Directory Lightweight Directory Services (AD LDS).

New and Improved Migration Procedure 

Earlier, this operation was pretty painful for administrators. It required building completely new parallel server farm and export of configuration from old one which will then be imported into a new one. 

In ADFS 2016, Microsoft took a different approach, and simplified the process by a lot.  

Now, moving from ADFS (on Windows Server 2012 R2) to ADFS 2016 requires adding new Windows Server 2016 to an existing Windows Server 2012 R2 farm. This will completely run as 2012 R2, but with adding more servers to the farm and removing old ones from the load balancer, the system will allow upgrade and usage of new features.  

More Features

Other than these, some more important new options and interesting features of ADFS 2016 are:

  • Supports the latest modern protocols which will provide a better user experience on the most relevant platforms (Windows, iOS, Android).
  • Ability to add industry standard OpenID Connect and OAuth 2.0-based authentication and authorization to applications in development.
  • A way to customize messages, images, logos, and web themes per application.
  • Streamlined auditing for easier administrative management and configuration to participate in confederations such as InCommon Federation and other implementations conforming to the eGov 2.0 standard. 

ADFS 2016 provided the best improvements in the development of the Windows Server systems, especially in the extranet access situation. Most experts agree that listening to user feedback made a significant impact.

New Active Directory Features in Windows Server 2016

Active Directory is an extensively-used service on many enterprise networks. Besides offering authentication and authorisation services in Windows domain-type networks, Active Directory supports several other capabilities, which makes it popular.

Windows Server 2016 Active Directory Improved Features

In Windows Server 2016, the Active Directory Domain Services (AD DS) received some enhancements intended to assist organisations realise optimised performance for their network resources.

In this article, we are going to talk about four significant features improved in AD DS.

Privileged Access Management (PAM)

Microsoft has introduced privileged access management (PAM) feature to assist in safeguarding AD DS from credential theft attacks. Examples of such types of attacks include spear phishing and pass-the-hash.

At its core, PAM depends on the Microsoft Identity Manager (MIM) as well as a domain functional level that is not below Windows Server 2012 R2.

The MIM is important for provisioning what is called the bastion Active Directory forest. Whenever PAM is configured, MIM generates a new Active Directory forest, which is segregated to be accessed by privileged accounts. The created Active Directory environment is freed from any illicit activities.

With the creation of the trusted Active Directory environment, MIM can now determine the assigning of permissions to users.

MIM offers workflows for granting administrative privileges, which is based on the type of requests approved. If users are given extra administrative privileges, they are also given memberships in the shadow security groups found in the created secure forest.

What’s more, membership to the groups is time-bound. MIM has an expiring links feature which allows memberships to be revoked after the allocated time period elapses. Users are given just enough time to complete the allocated administrative duties. This time-controlled membership is defined as a time-to-live variable.

If a user enjoys time-controlled membership in several security groups, Microsoft has included improvements in Kerberos Key Distribution Center (KDC) to take care of such a situation by restricting his or her Kerberos ticket lifetime to the lowest attainable time-to-live value.

Furthermore, PAM also provides improved monitoring tools. As such, it makes it easy to quickly establish the users who requested access permissions, the level of access that was given, and the type of tasks that were completed.

Azure Active Directory Join

With the Azure Active Directory Join feature, you can deploy your identity management tasks to the cloud and benefit from centralised management for your corporate and personal devices.

The main objective of the Azure Active Directory Join is to offer the advantages of an on-premise Active Directory environment without much hassles to the users.

This new feature enables users to access Oxygen Services without the need of a Microsoft account. Oxygen Services, with its various features and settings, will be available on devices that are connected to on-premise Windows domain as well as devices connected to the Azure Active Directory account.

Azure Active Directory Join also allows devices, whether they are corporate-owned or BYOD, to benefit from single-sign on web applications. It also allows those devices to be managed using the Mobile Device Management (MDM) integration tool, even if they are not in the Windows intune tool.

It is also possible to use the feature to configure “Kiosk” mode for shared corporate and personal devices. There are also some developer improvements that enhance the process of creating applications for both enterprise and personal uses.

Microsoft Passport

The use of weak credentials is one of the major security issues facing the IT industry today. Most users do not care about their password security and engage in insecure habits like using the same password in numerous places, using poorly crafted passwords, and using simple passwords that are easy to guess.

Fortunately, Microsoft Passport intends to provide a solution to this issue. It incorporates two-factor authentication techniques that enhance the security of users’ passwords without needing the traditional, complex methods like physical smart cards.

Microsoft Passport is created to work together with Windows Hello (the in-built biometric sign-in for the Windows operating system).

Its two-factor authentication technique utilises the credentials available to the user together with the precise credentials of the device the user is accessing. Every user accessing a device is given a precise authenticator (referred to as hello) or a PIN, which verifies the identity of the user before being allowed access.

Microsoft is calling this new Passport feature “password-less authentication”, which can be deployed to safeguard traditional on-premise Active Directory environments and Azure Active Directory environments.

Additionally, the Passport feature can also be used in FIDO (Fast Identity Online) accounts. With the FIDO capabilities, Passport can be used in extensive array of platforms and devices, eliminating the need to remember multiple passwords.

Deprecated features

There are a few features that are no longer supported in Windows Server 2016. For example, the old File Replication Service (FRS), which was utilised to replicate folder data between servers, has now been exclusively replaced with Distributed File Service (DFS) Replication. DFS is useful in replicating SYSVOL.

Furthermore, the Windows Server 2003 functional levels are not recognised in Windows Server 2016. Consequently, to achieve increased reliability and performance, all domain controllers still depending on Windows Server 2003 are required to be taken out from the domain.

Therefore, it is recommended for companies to increase their functional level to Windows Server 2008 (or even to a higher level). Shifting to the higher functional levels guarantees optimal SYSVOL replication compatibility as well as faster support for enhanced performance.

Conclusion

Each of the above Active Directory features are intended to enhance the experience of the large community of Windows Server 2016 users.

PAM offers a technique for preventing credential theft when data is being exchanged in very sensitive environments.

Azure Active Directory Join functionalities allow users to benefit from the advantages of on-premise Active Directory without much hassles. Microsoft Passport aims to revolutionise the way authentication takes place.

Finally, the deprecated features points to Microsoft’s commitment to eliminate flaws and inconsistencies in Windows Server 2016.

Useful Resources

Here is a guide how to set up Active Directory in Windows Server 2016: https://blogs.technet.microsoft.com/canitpro/2017/02/22/step-by-step-setting-up-active-directory-in-windows-server-2016/


Report NTFS Permissions in 60 Seconds!

Download your Free Edition of the easiest and fastest NTFS Permission Reporter now!

Quota Management in Windows Server 2016

Quota management is a valuable feature that enables users to restrict the storage capacity of shared resources in Windows Server 2016. If you create quotas, you will limit the space allocated to a volume or a folder—allowing you to practice capacity management conveniently.

Quota Management in Windows Server 2016

To set quotas in Windows Server 2016, you’ll need to use a tool called File Server Resource Manager (FSRM). This tool assists in managing and organising data kept on file servers.

The File Server Resource Manager tool consists of the following five features.

  • File classification infrastructure—this feature allows you to organise files and implement policies.
  • File management tasks—it enables you to implement conditional policies or tasks.
  • Quota management—it assists you to restrict the space available on shared folders.
  • File screening management—it allows you to limit the type of files that users can keep. For example, you can set a file screen to prevent users from creating MP3 files on the files server.
  • Storage reports—with this feature, you can generate reports to understand trends in disk utilisation and how data is organised, which enables you to spot unauthorised activities.

In this article, we are going to talk about the quota management feature in FSRM.

Setting up File Server Resource Manager

We need to install the File Server Resource Manager tool before using it for quota management.

A quick way to complete its setup is through the GUI server manager.

Here are the steps for installing the tool.

1. Start by logging into the Windows Server 2016. Then, on the Server Manager’s dashboard, click on “Manage” and select “Add Roles and Features”.

2. On the “Before You Begin” screen click “Next”.

3. Select “Role-based or feature-based installation” and click “Next”.

4. Select your destination server and click “Next”.

5. On the “Select Server roles” dashboard, expand “File and Storage Services” and “File and iSCSI Services”.

Then, select “File Server Resource Manager” and click “Next”.

6. On the window that pops up, Click the “Add Features” button to incorporate the required features.

Click “Next”.

7. If you do not need to add any extra features, just leave the default settings and click “Next”.

8. Confirm the installation selections and Click “Install” to start the process.

9. After the installation process is complete, click the “Close” button.

10. You can now access the File Server Resource Manager from the administrative interface and use it to create quotas.

Creating Quotas Using FSRM

As earlier mentioned, quota management enables you to set restrictions and define the extent of space available for users in the server. For example, you can limit all users to a maximum of 5GB on a shared folder. As such, the users cannot add data to the folder that exceeds 5GB.

You can also configure the File Server Resource Manager tool to be sending notifications whenever the specified usage limit is reached. For example, you can specify that an email is to be sent if 85% of the space has been consumed.

Creating quotas using the FSRM tool is a two-step process:

  • Create a template
  • Create a quota

a) Create a template

Before setting quotas, you need to either create a quota template or choose a default template already available on the File Server Resource Manager tool.

It is recommended that you create quotas solely from templates. This way, you can easily manage your quotas by making changes to the templates rather than the individual quotas. The one central location for managing quotas eases the enactment of storage policy rules.

Here are the steps for creating a quota template.

1. Under the “Quota Management” Section, right-click the “Quota Templates” button and go for “Create Quota Template”.

2. On the window that pops up, enter the Template name and the space limit. If you choose the “Hard quota” option, users will be unable to surpass the specified limit. A hard quota is good for controlling the amount of data allowed on a folder or a disk.

On the other hand, if you select the “Soft quota” option, users will be able to exceed the allocated limit. A soft quota is mostly used for monitoring space usage and producing notifications.

3. Lastly, to set notification thresholds, press the “Add” button. On the window that pops up, input your notification specifications.

You can specify that an email is to be sent, an entry is to be made to the event log, a command is to be run, or a report is to be generated. For example, you can state that whenever usage reaches 85%, send an email message to the administrator.

Thereafter, click “OK” to complete creating the quota template.

b) Create a quota

After setting up the quota template or using a default quota template, you need to create the quota.

Here are the steps for creating a quota.

1. On the File Server Resource Manager’s dashboard, right-click on “Quotas” and go for “Create Quota”.

2. On the “Create Quota” window, in the “Quota path” section, browse the path to the volume or folder that the storage capacity restriction will be applied.

Then, choose either the “Create quota on path” or the “Auto apply template and create quota…” option.

If you select the first option, quota will only be applied to the primary folder. For example, if you limit the parent folder to only 5GB, then the other subfolders will share the space specified in the main folder.

On the other hand, if you choose the second option, then the quota will also be applied to the subfolders. For example, if you restrict the main folder to 5GB, then the subfolders will also have individual quotas of 5GB each.

Subsequently, on the “Derive properties from this quota template” option, choose the template you created previously.

If satisfied with the quota properties, click “Create”.

After you’ve created the quota, you can see it on the File Server Resource Manager’s dashboard. Thereafter, you’ll be able to limit the amount of space allowed on your shared resources.

We hope this article has cleared things up.

Do you want to learn about NTFS Permissions, Share Permissions, and how to use them?

Grab your free course HERE!

Prevent Unauthorized Access to Sensitive Windows Folders!

Get your free edition of the easiest and fastest NTFS Permission Reporter now!

Optimizing File Server Performance in Windows Server 2016

If you have a file server system in your company, you may want to tune some parameters and settings to enhance its performance.

For example, you may want the highest possible throughput on your server to meet the growing workload needs.

This article gives a set of guidelines that you can implement to optimize the file server settings in Windows Server 2016 and benefit from optimized performance.

How to Optimize File Server Performance

1. Choose a Proper Hardware

Foremost, you should go for a good hardware that will sufficiently support your performance incremental efforts. If the hardware cannot meet the expected file server load, the software adjustments may not yield significant fruits.

Here are some important hardware parameters you should optimise.

  • Response times
  • Growth expectations
  • Loading factors—such as average load and peak load
  • Capacity level

2. Optimise SMB Parameters

The Server Message Block (SMB) protocol is included into the Windows Server to enhance the sharing of files and other resources across the network.

The latest version available on Windows Server 2016 is 3.1.1, and it comes with several helpful features you can optimise to get the most of it.

Here are some tips on how to optimise the various SMB parameters.

a) Practice the “least privilege” principle

You can practice the principle of least privilege by limiting access to some services or features. If a file server or a file client do not need any feature, just disable it. Period.

Some of the features you can disable include:

  • SMB signing
  • SMB encryption
  • NTFS encryption
  • File system filters
  • Client-side caching
  • Scheduled tasks
  • IPSEC

By the way, check out our FolderSecurityViewer to analyze and report NTFS permissions. Download the Free Edition now!

b) Configure power management mode

A constant high workload will reduce the speed and performance of your server. Therefore, for a comfortable working experience, you should make sure that the configurations for any BIOS as well as operating system power management is done correctly.

For example, this may consist of High Performance mode or even modified C-State. To avoid any bottlenecks, remember to install the most up-to-date, robust, and quickest storage and networking device drivers.

c) Follow file copying best practices

Users usually copy files from one location to the other on file servers. There are some best practices you can follow to enhance the speed of transferring files.

Windows has numerous utilities you can run on the command prompt and conveniently transfer files. For example, the recommended ones are Robocopy and Xcopy.

If using Robocopy, it’s advisable to include the /mt option to quickly copy and transfer several small files. It is also advisable to use the /log option to lessen console output by enabling redirection to NUL device or to a file.

If using Xcopy, you can significantly increase performance by including the /q option (which lowers CPU overhead) and /k option (which lowers network traffic) to your present parameters.

d) Practice SMB performance tuning

It is important to note that the performance of a file server will largely depend on the parameters set on the SMB protocol. If the parameters are well tuned, the file server performance can greatly improve.

Here is a table giving some of the registry settings that can influence the operation of the SMB file servers, together with some recommended practices.

ParameterRegistry SettingsRecommendations
Smb2CreditsMin

and

Smb2CreditsMax
HKLM\System\CurrentControlSet\Services\LanmanServer\Parameters\Smb2CreditsMin


HKLM\System\CurrentControlSet\Services\LanmanServer\Parameters\Smb2CreditsMax

The defaults are 512 and 8192 correspondingly.


Check SMB Client Shares\Credit Stalls /Sec to observe any problems with credits.

Additional
CriticalWorkerThreads
HKLM\System\CurrentControlSet\Control\Session Manager\Executive\
AdditionalCritical
WorkerThreads
The default is 0. You could raise the value if the quantity of cache manager dirty data is consuming a larger percentage of memory.
MaxThreadsPerQueueHKLM\System\CurrentControlSet\Services\LanmanServer\Parameters\MaxThreadsPerQueueThe default is 20. In case the SMB2 work queues are increasing significantly, raise the value.
AsynchronousCreditsHKLM\System\CurrentControlSet\Services\LanmanServer\Parameters\MaxThreadsPerQueueThe default is 512. In case a big quantity of concurrent asynchronous SMB commands is needed, raise the value.

Here is an example of how the settings can be applied to achieve optimum file server performance on Windows Server 2016.

Note that the settings are not suited for all computing situations, and you should assess the effect of every individual settings before using them.

ParameterValueDefault
AdditionalCritical
WorkerThreads
640
MaxThreadsPerQueue6420

3. Optimise NFS Parameters

The Network File System (NFS) model available in Windows Server 2016 is important for enabling client-server communications in mixed Windows and UNIX environments.

Here is a table giving some of the registry settings that can influence the operation of the NFS file servers, together with some recommended practices.

ParameterRegistry SettingsRecommendations
OptimalReadsHKLM\System\CurrentControlSet\Services\NfsServer\Parameters\OptimalReadsThe default is 0. Before making any changes to the setting, evaluate its effect on system file cache grow.
RdWrNfsHandleLifeTimeHKLM\System\CurrentControlSet\Services\NfsServer\Parameters\RdWrNfsHandleLifeTimeThe default is 5. Appropriately set it to ensure optimal control of the lifetime of NFS cache.
CacheAdd
FromCreateAndMkDir
HKLM\System\CurrentControlSet\Services\NfsServer\Parameters
\CacheAdd
From
CreateAndMkDir
The default is 1. Adjust the value to 0 to deactivate the inclusion of entries to the cache in CREATE and MKDIR directories.
MaxConcurrent
ConnectionsPerIp
HKEY_LOCAL_MACHINE
\System\CurrentControlSet\Services\Rpcxdr\Parameters
\MaxConcurrentConnections
PerIp
The default is 16. Raise it to the highest value of 8192 to increase the number of connections for every IP address.

4. Uninstall Unused and Redundant Features

Windows Server 2016 has dozens of logging, monitoring, and debugging tools, most of which you may not find useful.

The amount of space available on the server is critical and allowing unused and redundant tools to just sit there is not doing any justice to your server.

On a regular basis, you should visit the “Service Control Manager” section and remove services and features that do not add value to your file server.

You should uninstall any utility or application that you find not useful, and your file server performance will greatly improve.

For example, you should always deactivate the DOS 8.3 short file names. For backward compatibility, your Windows Server 2016 may contain the DOS 8.3 file names, especially if you upgraded your server from an older version of Windows.

These days, the 8.3 short file name is unnecessary, and they do not add any value to the operation of the file servers. Therefore, disabling this feature will provide some additional speed to your Windows Server 2016.

References

Microsoft. (2017). Performance tuning for SMB file servers. Retrieved from https://docs.microsoft.com/en-us/windows-server/administration/performance-tuning/role/file-server/smb-file-server

Apachelounge. (2017). Performance tuning guidelines for Windows Server 2016. Retrieved from https://www.apachelounge.com/download/contr/Perf-tun-srv-2016.pdf

Prevent Unauthorized Access to Sensitive Windows Folders!

Get your free edition of the easiest and fastest NTFS Permission Reporter now!

The Best New Windows 2016 Features

Microsoft has introduced a wide array of beneficial new features in Windows Server 2016. The new improvements will revolutionise your view of data centres. If you upgrade to the new platform, your server management capabilities will benefit from the improved functionalities.

Here are the additional enhancements that easily stand out.

1. Nano Server

Without a doubt, the most intriguing feature in Windows Server 2016 is the new Nano Server. The Nano Server is an improved installation option, which has been refactored to its minimal functional state.

Microsoft has minimalised it such that it lacks any direct user interface, apart from the new Emergency Management console, which is used for carrying out initial configuration duties. In fact, the Nano Server is developed to be managed entirely remotely.

Consequently, Nano boasts of 93% reduced VHD (Virtual Hard Disk) size, 92% lowered critical bulletins, and 80% reduced essential reboots than the previous Windows Server.

In summary, the new Nano Server offers the following benefits:

  • The bare metal operating system implies that minimal updates and reboots are required.
  • Since it’s managed remotely, the server comes with a much lesser attack surface than the previous Windows Server.
  • It is very light in weight such that it can be ported conveniently across servers, applications, and data centres.
  • It hosts the most widely used Windows Server workloads. A notable example is Hyper-V host.

2. Docker-powered containers

Docker is an open-sourced platform that allows applications to be built and deployed easily in the form of lightweight, independent sandboxes (known as containers) that can operate on a wide range of environments.

Although Docker-powered containers were primarily developed for Linux/UNIX applications, they are now incorporated in Windows Server 2016. With this new technology, Microsoft expects to bring the advantages of containerisation to the server environment.

Windows Server 2016 supports two types of containerised models:

  • Windows Server Containers: They are based on the typical Docker model where every container is deployed as an application on top of the host operating system. They are suited for low-secure workloads where the sharing of common server resources is not a problem.
  • Hyper-V Containers: They are not Hyper-V hosts or VMs. On the contrary, these containers are entirely secluded virtual machines. Since the Hyper-V containers are cut off from the other containers, they are suited for high-secure workloads.

3. Shielded VMs

One of the best-improved security aspects of Windows Server 2016 is the Host Guardian Service, which comes with the Shielded VMs feature. This feature offers multiple layers of in-built fortification to protect virtual machines from compromised access.

Shielded VMs utilise VHD encryption technology together with a consolidated certificate depository for approving access to the virtual machines. A user will be allowed access only if his or her entry aligns with any of the approved benchmarks in the depository.

Every virtual machine utilises a Trusted Platform Module (TPM) to support the usage of disk encryption with BitLocker. Furthermore, live migrations are also encrypted to protect the virtual machines from man-in-the-middle attacks.

For example, if your Hyper-V host has virtual machines from several tenants, and you want to enforce their security to prevent any user or administrator from gaining unauthorised access; in such a situation, you can use BitLocker Drive to encrypt the hard disks of the virtual machines.

4. Networking improvements

Another feature that has been greatly improved in Windows Server 2016 is networking. The improvements are meant to boost its software-defined networking capabilities and enhance performance.

Here are some networking features that have been improved.

  • Network controller: This new Software-Defined Networking (SDN) technology offers a centralised location for automating the management of network infrastructure. So, rather than carrying out manual management and configuration of virtual and physical network devices in a datacentre, a network controller will assist you in automating the processes.
  • Hyper-V Virtual Switch: This new technology operates on Hyper-V hosts. It enables you to build distributed switching and routing capabilities as well as policy enforcement layers which can comfortably connect to Microsoft Azure.
  • Network Function Virtualization (NFV): This new feature adds to the current growth of virtual appliances. Some of the NFV technologies introduced in Windows Server 2016 are Datacenter Firewall for offering granular access control lists (ACLs) and RAS Gateway for directing data between virtual networks and physical networks.
  • Converged Network Interface Card (NIC): This feature allows you to use fewer network adapters for controlling traffic, which drastically lowers the costs related to managing every server in your datacentre.
  • Other networking features: Other exciting new features include the inclusion of the DHCP network management protocol, the DNS naming system structure, the IP address management (IPAM) capability, and the GRE tunnelling feature.

5. Hyper-V

Microsoft has also introduced a number of helpful features to the Hyper-V virtualisation platform. With these new Hyper-V functionalities, enterprises can take their virtualisation experience to the next level.

To start with, rolling Hyper-V upgrades simplifies and fastens the migration of clusters from Windows Server 2012 R2 to Windows Server 2016. This new feature allows you to carry out the upgrades without bringing the cluster down or moving to a new hardware.

Previously, upgrading a cluster required that you first bring it down or deploy a new hardware, something which made the process unnecessarily tiresome. However, the rolling cluster upgrades significantly lowers the effort required to make an upgrade and makes the entire process less agonising.

Another Hyper-V improvement is nested virtualisation. This feature allows you to host a Hyper-V within a Hyper-V virtual machine—instead of being restricted to hosting the Hyper-V role on a physical server. Previously, this capability was impossible, but it has been introduced in Windows Server 2016.

If you want to deploy extra Hyper-V hosts and reduce hardware costs, the nested virtualisation feature will be of great help. You can also find the feature useful during development and testing situations.

Lastly, Hyper-V server now allows you to hot add or remove a virtual hardware or adjust the virtual memory, without experiencing any downtime issues. Previously, performing such changes required that you first switch off the virtual machine.

In Windows Server 2016, such changes can be made even when the virtual machine is online and running. For example, you can now include another virtual network interface card (NIC) to an operating Hyper-V virtual machine.

6. Storage improvements

Windows Server 2016 has wonderful storage enhancements that are intended to increase availability, improve scalability, and reduce costs.

Here are the improved storage features.

  • Storage Quality of Service (QoS): This feature allows you to centrally manage storage performance policies for multiple virtual machines. If several virtual machines make up a service and a central way of managing their storage capabilities is needed, the QoS feature could be of help.
  • Storage Spaces Direct: This feature enables failover cluster nodes to utilise their local storage within the current cluster. As such, contrary to the previous versions, it eliminates the need for a shared storage fabric.
  • Storage Replica: This feature allows you to carry out either asynchronous or synchronous block-level replication of entire volumes. It supports both server-based and cluster-based replications. The Storage Replica feature is useful in disaster recovery situations.

7. Other improved features

  • New PowerShell cmdlets: Windows Server 2016 has several new and updated PowerShell commands and parameters focused on enhancing the management of virtual machines. For example, PowerShell remoting commands can now be used to transfer PowerShell directly into the Hyper-V host’s virtual machines, something which was impossible in the previous Windows Server versions.
  • Active Directory Federation Services (ADFS): This technology finally introduces some advanced security features to Windows Server 2016, including OpenID Connect-based verification and multifactor verification.
  • Linux Secure Boot: With this capability, you can deploy Linux virtual machines without the hassle of deactivating the otherwise important Secure Boot feature. The Windows-based Secure Boot feature safeguards a server’s start-up environment from being compromised during boot-time. Previously, the Secure Boot feature was not included in virtual machines running on the Linux operating system.
  • Resilient File System (ReFS): This is a high-performing, stable, and high-resiliency file system used for increasing the efficiency of Hyper-V storage capabilities.

Conclusion

Windows Server 2016 is rich in various computing, virtualisation, and security features, which were not available in the previous versions.

With the new and improved capabilities, Microsoft has demonstrated its commitment to assist customers make the most of their data centres.

Therefore, if you want to take your server management experience to the next level, upgrade to Windows Server 2016 today!


Here are some useful resource:


Prevent Unauthorized Access to Sensitive Windows Folders!

Get your free edition of the easiest and fastest NTFS Permission Reporter now!