How to Configure NFS in Windows Server 2016

NFS  (Network File System) is a client-server filesystem that allows users to access files across a network and handle them as if they are located in a local file directory. It is developed by  Sun Microsystems, Inc, and it is common for Linux/ Unix systems. 

Since Windows Server 2012 R2, it is possible to configure it on Windows Server as a role and use it with Windows or Linux machines as clients. Read to know about How to Configure NFS in Windows Server 2016 here.

How to install NFS to Windows Server 2016 

Installation of NFS (Network File System) role is no different than an installation of any other role. It goes from “Add roles and features Wizard”. 

With few clicks on  “Select server roles” page, under File and Storage Services, and expansion of File and iSCSI Services, the system will show checkbox “Server for NFS”. Installation of that role will enable NFS server. 

The configuration of NFS on Windows Server 2016 

After installation, it is needed to configure role properly. The first stage is choosing or creating a folder for NFS (Network File System) share. 

With right click and properties option, the system will bring the NFS Sharing tab, and Manage NFS sharing button, as part of the tab. 

It will provide  NFS Advanced Sharing dialogue box, with authentication and mapping options, as well as with “Permissions” button. 

Clicking on “Permissions” button will open Type of access drop-down list, with the possibility of root user access, and permission level. 

By default, any client can access the NFS shared folder, but it is possible to control or limit the specific clients, with a clicking of Add button and type the client’s IP address or hostname. 

 Mount NFS Shared Folder on Windows Client 

The steps above make NFS (Network File System) server ready for work.  

To successfully test it, it is needed to mount chosen NFS folder on a Linux or Windows client with following steps: 

  1. It is needed to activate a feature on the client, by clicking Control Panel / Programs and Features / Services for NFS / Client for NFS
  2. After installing the service, it is needed to mount the folder with the following command :
mount –o \\<NFS-Server-IP>\<NFS-Shared-Folder> <Drive Letter>: 

 The command maps folder as drive and assigns chosen letter to it. 

Mount NFS Shared Folder on Linux Client  

No matter NFS is common to Linux / Unix systems, it is still needed to mount folder to a system via command, similar to windows systems. 

mount –t NFS <NFS-Server-IP>/<NFS-Shared-Folder> /<Mount-Point> 


Do you have unclear NTFS Permissions assignments?
Do you have too many special permissions set on your fileservers?
Or blocked NTFS Permission Inheritance?

Protect yourself and your clients against security leaks and get your free trial of the easiest and fastest NTFS Permission Reporter now!

Overview: How to Troubleshoot Active Directory Replication Issues

Active Directory Replication is more or less the center of all sorts of problems. It is a crucial service and it becomes more complicated when dealing with more than one domain controller.  Issues relating to replication can vary from authentication issues and problems arising when trying to access resources over the network. 

All objects in the Active Directory are replicated between domain controllers so that all partitions are synchronized. A large company with multiple sites means that replication takes place at the local site as well as the other sites to keep all partitions synchronized. This article aims to show you how to troubleshoot Active Directory replication issues. 

Active Directory replication problems come from different sources, some of which are Domain Name System failures, network problems, or security issues. 

Resources Needed to Troubleshoot Active Directory Replication 

Failures coming in and out the active directories due to replication issues lead to many inconsistencies between domain controllers. Such failures lead to systemic failures or inconsistent output. Identifying the main cause of replication failure helps system administrators identify the possible cause and hence elimination of the problem.  One of the commonly used interfaces based replication-monitoring tool is the Active Directory Replication Status Tool. 

Understanding Recommendations from the tool solution 

The red and yellow warning events in the system logs will always point out to the specific cause of replication failure and give the source and destination in the Active Directory. Any steps that are suggested by the warnings should be tried as explained. Other tools such as the Repadmin tool can give more information to help resolve replication issues. 

  • Eliminating Disruptions or Hardware Failures 

Before troubleshooting replication failures, it is important to rule out any issues related to software updates or upgrades, intentional disruptions, software configurations, and hardware failures. 

  • Intentional Disruptions 

Disruptions caused by unavailability (offline state) of a remote domain controller can be corrected by adding the computer as a member server using the Install From Media (IFM) method to configure the Active Directory Domain Services. The Ntdsutil command-line tool can be used to create installation media. 

  • Software Upgrades and Hardware Failures 

Hardware failures can come from failing motherboards or hard drives. Once a hardware problem is identified, system administrators should take immediate action to replace the failing components. Active Directory Replication failures can take place after a planned upgrade. The best way to handle this is through an effective communication plan that prepares people in advance. 

  • Software Configurations 

Some software settings such as the typical windows firewall have port 135 open alongside other advanced security settings. Some firewalls can be configured to allow for replication. 

Responding to Failures Reported on Windows 2000 Server 

Active Directory configured on Windows 2000 Server that has failed beyond the tombstone lifetime should be resolved by: 

  • Moving the server from a corporate to a private network 
  • Removing the Active Directory or Reinstalling the Operating System 
  • Removing its metadata from the Active Directory to hide its objects 

Removing the server metadata ensures that any attempt by the server to revive objects settings after 14 days is impossible. This also helps avert further error logs due to replication attempts with a missing Domain Controller. 

What are the Root Causes of Replication? 

Apart from the already discussed causes leading to replication failures, here are some other reasons. 

Network Connectivity: caused by unavailable network or wrong configurations 

Name Resolutions: Wrong DNS configurations 

Authentication and Authorizations: Aces denied errors every time a domain controller tries to connect for replication 

Directory Database: A slow data store not being able to handle fast transactions that take place within replication timeouts. 

Replication Engine: when replication schedules are short, it will lead to longer queues and large processing which may not be possible within the outbound replication schedule. 

Replication Topology: All domain controllers need to have links linking them to other sites within the Active Directory.  The links should map wide area networks or the virtual private network connections. All objects should be supported by the same site topology within the network to avoid replication failures. 

How do We Fix Replication Problems 

Any of the following approaches can be used to fix Active Directory Replication Issues: 

  • Daily monitoring of the state of replication using the Repadmin.exe to extract daily status updates 
  • Resolving reported replication failures as soon as possible, using steps provided in the event logs. Replication failures resulting from software configurations require un-installation of the software before attempting any other solutions. 
  • If all attempts to resolve replication issues do not work, remove the Active Directory Directory Services from the server and reinstall. 

When an attempt to remove AD DS fails when the server is online, any of the following methods can resolve the issue. 

  • Force the removal of the AD DS from the Directory Restore Mode (DSRM) by cleaning up the server metadata and reinstall the AD DS. 
  • Reinstall Operating system and reconfigure the Domain Controller 

Retrieving Replication Status Using Repadmin 

When everything in the Active Directory is working as intended and produces no errors, then it means the following services are working correctly: 

  • DNS 
  • Remote Procedure Call (RPC) 
  • Network Connectivity 
  • Window Time Service (W32time) 
  • Kerberos Authentication Protocol 

The Repadmin tool is used to study the daily replication activities. The tool is able to access all the replication status of all domain controllers in the forest. The report is relayed in a .CSV format that can be accessed using any spreadsheet reader. 

Generating Repadmin for Domain Controllers in a Spreadsheet.                                 

Using the command prompt as an administrator type the following: 

Repadmin /showrepl * /csv &gt; showrepl.csv 

  • Open Microsoft Excel, navigate to the showrepl.csv, and click open 
  • Hide or delete column A and the Transport Type Column 
  • Select the row below the column heading and click freeze panes by clicking on Freeze Top Row 
  • Select the whole spreadsheet and click filter from the data tab 
  • Click on the down arrow below the source DC column, point to text filters, and select the custom filter. 
  • In the custom AutoFilter box, below show rows where click on does not contain.  On the box next to it, type Del to eliminate results from deleted domain controllers. 
  • Repeat the previous step for the Last Failure Known Column and use does not equal and type 0 
  • Resolve replication issues. 

 Conclusion 

Replication going on smoothly throughout the Active Directory is critical. Poor replication means all manner of problems from authentication to inconsistent results.  The article is supposed to help you check on your system’s replication status and learn how to resolve the common replication errors.  

Protect Yourself and discover all permissions owner on your Windows fileservers!

Pass your next security audit without worrying about security leaks!

Get your free trial of the easiest and fastest NTFS Permission Reporter now!

Guide for Securing File Server

How hardened is your organization’s file server to protect data from unauthorized access? Every organization running a file server needs to have a way of protecting sensitive information from unauthorized access, especially from outside.

The fact that your server may be in a physically secure place does not mean the security configurations within the operating system should be ignored and the system left at the mercy of anyone with an access to the building.

The file server being the most visible and central network device with critical information should be secured using some of the approaches this guide proposes. System administrators should use the hacker’s point of view when reviewing security policies to help them find a better approach to server security settings.

The Guide

Securing a file server ensures that the organization enjoys the fill benefits of a server in its opium working condition. Here are some of the steps one needed to enforce server security settings.

1. The configuration of the operator group
Instead of using the default Administrators group, another group of people (user accounts) authorized to access the server using different access levels should be created. The default administrator account should be used as the final resort.

Operator Group can be defined by different tasks users are assigned as far as modifications of security settings are concerned. To perform this task, open the Organizational Unit and remove unwanted groups, but retain the default Domain Administrators. Create the Operators Group and give Full Control to both Domain Administrators and Operators group.

2. Create A Security Template
By the time you sit down to secure the File Server, you must already be having security settings that can be used on the network or in a standalone environment. Security setting templates can be created and then be imported into group policy to be implemented across the entire network.

The security templates need to be flexible in that when more than one is applied to the same server, there should never be a conflict.

Setting Account Policies
Account policies are settings that have to do with Passwords, Account Lockout, and Kerberos Policy. All policies should be applied at the domain level. For a standalone file server, the local accounts are used to access it, therefore security settings of these accounts need to be set up.

Other settings include:

  • Increasing the minimum password length – long passwords mean that the hacker longer time to crack local account passwords.
  • Decreasing maximum password age – reducing the aging date of a password means more frequent password changes, therefore, increasing the integrity of local user accounts.
  • Account lockout duration – this setting determines the lockout period a person has to wait to re-enter the password. A ‘0’ setting means the user logged out until password reset and a ’30’ means attackers will have to wait longer to key in more attempts.

Setting the Local Policies
Under local policies, system administrators need to look at the Audit policies, user rights, and security options.

  • Audit Policy
    Turing on the Audit Policy setting is an indication that the files, registry, folders, and printers can be tracked. This gives the administrators the freedom to choose which objects to log and the level of monitoring to use. In a high-security environment, knowing who is responsible for what activity is paramount, therefore auditing privileges is required when securing the File Server.
  • User Rights
    When setting user properties on a local machine, rights such as “Act as part of the operating system” should be disabled.
  • Security Options
    Some default settings under this option can be used to tighten the security levels of a file server. Some of these defaults may not work with all Server Operating Systems, therefore testing before implementation is recommended.

Settings on Services
Services not installed should be disabled and a person responsible for starting, stopping, and disabling them identified. There are two specific services that can be applied in specific scenarios: Distributed File System (DFS) and File Replication Service (NTRFS).

The DFS works on local disks, shared across networks, therefore in such a scenario, disabling DFS means that users must know the names of the shared resources and servers on the network. NTRFS controls the automatic maintenance of files across multiple servers and it must be on Active Directory and Domain Controllers.

3. Determine the Template Application Strategy
Security templates can be imported to Group Policies and the domain so that they can be shared across multiple workstations and can be refreshed as needed. When dealing with workstations, security policies can be set using the /secedit/ command and the batch files re-written to refresh the settings.

4. Set up Restricted Groups
Make use of the Local Group Policy to restrict group activities. Local Administrators and any group that was created can be restricted. New users can be added to the restricted groups. Restricting administrators who can change system settings prevents unauthorized access.

5. Write IPsec Policies
Setting IPsec rules that block certain or all ports by applying specific filters to allow only communication from specific computers will guarantee File Server security. When left open, File Servers share information through various protocols that would-be attackers will find useful.

6. Set the Correct System
The correct time is critical for many reasons. Some authentication protocols need the client and server clocks to be synchronized. Synchronizing events between computers on a network will not take place due to time differences. When reading logs, the time stamp is important for auditing purposes.

7. Set Specific Account Restrictions
Restrictions can be implemented on individual accounts by limiting the hours, restricting which workstation a particular user an use, prevent account delegation, etc.

8. Setting the Local Server Security Settings
Settings that cannot be automated in a domain such as Guest user account and Guest group have unique identifiers that make it difficult to have an automated security setting. In such scenarios, setting local policies is necessary.

9. Track Attack Indicators
Events with warnings such as ‘Logon Failure’ and an increasing number of similar events should be treated as unauthorized attempts.

10. Using the Network File System (NTFS)
Setting the Access Control List (ACL) and the System Access Control List (SACL) on FAT volumes is not possible. File Server security depends on its ability to have security settings done as file permissions.

11. Use of Administrative Template Settings
Some security settings are not available in security template settings. They can only be set via the Administrative Templates within the Group Policy. Disabling error reporting at this stage is recommended because some error logs contain sensitive information that can be intercepted by hackers.

12. Documenting and Maintaining the Security Settings
When server security settings need to be altered, previous settings can be used as a reference point. Third-party tools such as Security Configuration Analysis can be used to verify the compliance of the security settings in place.

Conclusion

The security settings above are supposed to make the File Server secure. However, when doing so, make sure the settings do not interfere with server’s normal operations. Since every network setup is unique, it is recommended that File Server security setting is set up according to the needs and expectation of the organization.

Are your Windows folders secure, too?

Protect yourself and your clients against security leaks and get your free trial of the easiest and fastest NTFS Permission Reporter now!

Windows Server Optimization: Active Directory Auditing – Track User Logons

Tracking user logons gives system administrators an opportunity to identify active and inactive accounts and global access rights that could put the organization information at risk.

Active Directory auditing involves the collection of data on all Active Directory Objects and attributes that are helpful in analyzing and reporting the overall health of the Active Directory.

Audits are performed to secure the Active Directory from attacks and to keep the IT operations running. Tracking User Logons is needed to help in the following operations:

1. Track the logon activity on Domain Controllers.
2. Track user logon activities (logon failures, recent logons, last logon on workstations).
3. Track logon activities on Member Servers and Workstations.
4. Monitor RADIUS logon on computers.

In a busy working environment, Active Directory Auditing helps verify the number of users accessing the Active Directory at any given time, identify remote logon users, determine the peak logon sessions, monitor all critical logons, act on unauthorized attempts and access, and generate backup reports in case of any queries or investigations.

Why Using the Native Active Directory Auditing is Insufficient

1. The day-to-day logon information collected in the server logs may not be friendly to non-technical staff.
2. The logon information requires expertise to understand the specific events correlating to every logon activity.
3. The amount of data collected is voluminous due to the continuous activities on the Domain Controller. Dealing with such huge amount of data is tedious and time consuming.
4. The restrictive nature of the Domain Controllers means access to its logos are limited to specific personnel.
5. The inability of other Non-Administrative staff outside the IT department to access real time logon data also makes the Native Active Directory Auditing out of reach for managers, auditors, human resource staff, etc.

The Solution to Native Active Directory Auditing

The only possible way of tracking real time logon activities on a large scale for auditing is to use a software like Manage Engine ADAudit Plus that details all logon information into a single document that can be shared from a central server console.

The ADAudit Plus tool gives all information relating to successful and failed logon attempts.

Active Directory Logon Auditing

Real time auditing means tracking every logon activity as it happens to the entire Active Directory. The outcome of this audit is listing all logon activities that can be viewed on the central server in an instant.

The logon report contains information on failed logons, Domain Controller logon information, Member Server logon information, Workstation logon, recent and last logon activities.

Active Directory Logon Auditing also helps in reporting on specific logon events by listing all Logon related actions. All this information is presented on a web interface displaying data in statistical format via charts, lists, and graphs. Due to the insufficient nature of Active Directory, using the ADAudit Plus relays more information some of which are explained below:

Logon Activities on Domain Controllers
Domain Controllers from the critical element in Active Directory because all changes taking place in the Active Directory takes place here. Such logons are restricted to network administrators or privileged users. Any attempts by other users should be a wake up call for administrators to take corrective action.

ADAudit Plus give details such as user’s location, time of logon, success or failed logon attempts, and the reason for failure if any.

Tracker User Logon Activities (logon failures, recent logons, last logon on workstations)
Logon failure report gives information on reasons why a failure occurred and the number of failed attempts reported for a particular user. This information could be useful for system administrators on possible external attacks.

Some common reasons for logon attempts could be related to bad name or wrong password. Other reasons such as errors due to time restrictions, replication delays, and different workstation OS version can also be reported.

Reports on user logon give all the information needed for auditing the entire logon history on the server and the clients end. This information is only accessible to specific domain users. User’s logon history is used to draw a logon pattern and used to show system auditors proof of activities on the network.

Recent activities are used by administrators to ascertain whether every past logon was used as intended. An analysis of past logon can be used to measure levels of irregularities. ADAudit Plus gives details of both successful and failed logons alongside reasons for unsuccessful attempts. The unsuccessful logs are used for planning any corrective measures.

The last logon on workstations has all the information on the time of last successful logon attempts. The report of this audit can be used to show absenteeism or availability of a user.

Track Logon Activities on Member Servers and Workstations
Tracking logon activities on member servers and workstations help administrators tracks the logon activities of users with authority to access selected servers and workstations. The type of information displayed here are times of access, location of the user, including the workstation details, successful or failed logins, and the reason behind the logon failure.

Monitor RADIUS Logon on Computers
Users accessing the Domain server from a remote location need to use the Remote Authentication Dial-in User Service (RADIUS). Getting reports on remote users in the form of logon failures, authentication through the Active Directory and logon history. Only RADIUS logon activities running through Network Policy Servers can be reported.

Conclusion

Since the aim of any server optimization is to speed up operations and in the case of logon auditing, speed up reporting. Native Active Directory Auditing may give comprehensive information, but is weighed down by the reporting time.

System administrators should take advantage of Active Directory auditing tools such as ADAudit Plus to help in carrying Active Directory audit. An Active Directory Reporting tool should be able to filter out information by marking out WHEN a change in the Active Directory was made, WHERE the change took place, WHAT is the nature of the change, and WHO is responsible for the change.

All these identifiers in a report are to facilitate easier understanding when reviewing the summarized information.


Do you have unclear NTFS Permissions assignments?
Do you have too many special permissions set on your fileservers?
Or blocked NTFS Permission Inheritance?

Protect yourself and your clients against security leaks and get your free trial of the easiest and fastest NTFS Permission Reporter now!

How to Migrate Filesystems Data to Windows Server 2016

One of the most difficult and time-consuming tasks for IT Administrators is migrating file shares and their permissions. Before embarking on the migration, some procedures need to be followed to avoid mishaps like broken file systems or lost files.

The most common form of data migration is done by carrying all files and permissions. Microsoft has an inbuilt tool and PowerShell commands used as the migration tools. The migration utility eases the migration process by moving several roles, features, and even the operating system to a new server.

Depending on the prevailing circumstances prompting the migration we need to answer questions like:

1. Are we preserving the existing domain?
2. What are the settings of the old server?
3. Was the server running on a virtual machine?
4. Was the virtual machine on a different platform from the one we are moving files into?

Regardless of the reason behind the migration, different methods can be used to initiate the migration. If the existing server system has some pending issues, you are advised to sort them out before starting the migration process.

Using the Windows Server Migration Tool

We need to install the migration tool to ease the migration process. The Microsoft Server Migration tool will transfer server roles, feature, and some operating system to the destination server.

1. To get started, you need to install the migration tool through the PowerShell console using the following command:
Install-WindowsFeature –ServerName DestinationServer

2. Create a deployment folder on the destination server using the smidgeploy.exe utility (it is installed as an additional utility by the above command). To specify some specific attributes, use the following command:
C:\Windows\System32\ServerMigrationTools\SmigDeploy.exe /package /architecture amd64 /os WS08R2 /path <deployment folder path>

3. Create a deployment folder on the destination server, and then transfer its contents to the old server.

4. Use the Remote Desktop Protocol (RDP) to connect to the old server and run the smidgeploy.exe usually found on the following path:
C:\<DeploymentFolder>\SMT_<OS>_<Architecture>

5. After the installation, enable the destination server to accept deployment data. This is done using the PowerShell console using the following command:
Add-PsSnapin microsoft.windows.servermanager.migration

The PSSnapin command will activate all the PowerShell cmdlets.

6. Run the Receive-SmigServerData to open connection to the destination server. The time it takes to open connection is less than five minutes.

Sending Data to the Destination Server

1. Use the Send-SmigServerData in the PowerShell console. The following command defines the source path (remember the deployment folder that was copied from the destination server):
Send-SmigServerData -ComputerName <DestinationServer> -SourcePath <SourceDeploymentFolder> -DestinationPath <DestinationDeploymentFolder> -Include All –Recurse

2. When prompted for the password, use the password that was issued when running the Receive-SmigServerData on the destination server.

3. When the command completes, all file properties should be transferred to the destination server.

TIP: Confirm that all shares were transferred successfully by using Get-SmbShare in the PowerShell.

Alternatives to Windows Server Migration Tools

This involves taking the most recent backups and restores them on the new server. The backup method restores the data and not the file system. All the file permissions on the new server will be the same as before when they were on the old server. This is a generally fast approach, but the speed depends on file sizes.

1. Using the Free Disk2VHD Tool
If the current server is not virtualized, the Disk2VHD utility from Microsoft is reliable and fast because the subsystem allows the storage of files regardless of their sizes.

All NTFS permissions are retained and transferred to the new drive. The advantage of using this tool is the automatic creation of a fully compatible Hyper-V virtual drive.

2. Copy Utilities
Microsoft has many built-in coper utilities that transfer files with all permissions. The common server migration copy utilities are the XCOPY and ROBOCOPY.

Using XCOPY
The typical command should look like this:
XCOPY “\\sourceServer\ShareName\*.*” “\\destServer\ShareName\” /E /C /H /X /K /I /V /Y >Copy.log 2>CopyErr.Log

The parameters taken by the commander are:

/E – Copies both empty and directories with content.
/C – Copies without acknowledging errors.
/H – Copies all hidden and system files.
/X – Copies file audit settings (implies /O).
/K – Copies attributes; without this attribute will reset read-only attributes.
/I – Creates a directory if the file destination does not exist.
/V – Verifies the size of each new file.
/Y – Suppresses the prompt asking to overwrite existing destination file.

The command will execute and leave the output to a file and a corresponding error log file.

Using ROBOCOPY
The Robocopy command looks similar to this:
ROBOCOPY “\\sourceserver\ShareName” “\\destServer\ShareName” /E /COPYALL /R:0 /LOG:Copy.log /V /NP

The parameters taken by the command are:

/E – Copy all directories and its subdirectories.
/COPYALL – COPY ALL file info.
/R:0 – Number of Retries on failed copies: default 1 million. (When set to 0 it disables retries so that copy can go on uninterrupted.)
/LOG – Output the LOG file status.
/V – Produce output in details.
/NP – No Progress – Copy without displaying the percentage of files copied.

3. File Synchronization or Replication
Microsoft has many inbuilt tools that help system Administrators replicate data between two servers. This is disaster preparedness plan done to ensure data is available at all times.

The Distributed File System Replication (DSFR) is one way of synchronizing the contents between two shares. They can work with the Distributed File Name Space. Using the DFSR enables user shares via the path: \\Domain\share and not \\server\share

Both the DFSR and the DFS can bring together more than two servers to use one share pointing to multiple servers. Using the DFSR is easy when it comes to adding another server on an existing migration configuration.

Shares and Permissions

Since Windows 2000, file shares are stored in the registry at:
HKEY_LOCAL_MACHINE\SYSTEM\CurrentControlSet\services\LanmanServer\Shares

Instead of recreating shares, you can export this key to get all your drive paths and permission used by define shares. Using the registry to export shares means that all drive letters in the new server must match with the old server paths. To avoid any confusion, you are advised to assign same drive letters on both servers.

Conclusion

Whichever way you choose to migrate filesystems should be the most convenient and comfortable for you. All this depends on the level of skill and time needed to reduce the downtime likely to affect server operations.

Admin’s Advice: No to ‘Deny’ Permission

In this article, we will bring you some solutions that can help resolve an incorrect grant of a User’s rights. These solutions may also make an Administrator’s life easier by dealing with the consequences brought about by the misuse of the “Deny” permission.

Take this scenario as an example. The user changed Folder Permissions to Deny everyone. The Administrator then reverted these changes. It may appear that the situation has been fixed but the permissions show that the reverting of the settings is meaningless. Everyone still got the permission to read and write in the aforementioned folder. For an Administrator, the first step for this scenario is to check the perspective of Sharing and Security on a top-level folder. In our scenario, the sharing is set as follows: Domain Users, Administrators, and Domain Admins have read/write permissions; NTFS is set to give full control to System, Domain Users, and Domain Admins. The subfolders, meanwhile, have inheritance disabled since each subfolder has its own set permissions.

As we can see, the system in our imaginary scenario is a mess. But don’t lose hope yet, the situation can still be fixed. In fact, there is more than one solution that can fix the issue.

Before we go deeper into the solutions, the Administrator should keep in mind that ‘Everyone’ applies to all users, whether they are logged in or not. It also applies to those on or off the domain.

Let’s clarify some terms first. Authenticated Users are users that logged in the domain or forest. Domain Users are those that are on the current server’s domain. Make sure to keep this in mind because a ‘Deny’ on any of these may also mean a ‘Deny’ on the Administrator!

SOLUTIONS

Solution 1 – All users can log off then log back in again. This action enforces new NTFS permissions to the folder. If not all Users can log off simultaneously, the new settings can be set to standby until they do.

Solution 2 – Backups can be used to roll out the old settings and revert the permissions to the way they were before. Keep in mind that performing a Backup may take time so it is not recommended to do this during work hours, or if there are Users logged on to the system.

Solution 3 – The Administrator can get some insights into the User Permissions by clicking ‘Advanced’ in the Permissions window and then going to the Effective Access Tab. The Users and their individual access is shown in this tab. Although not an exact solutions, the Administrator can find answers to what permissions are set and being used.

Solution 4 – The easier solution is to crate new folders with the correct permissions applied to it and make these servings apply to the current folder and all the subfolders and files. Once all this is set, everything can then be moved to the folder with the corrected permissions. The Administrator has the option to take full ownership, rewrite permissions, and give full access to Domain Admins. After that, it is possible to decide who can have read/write permissions.

The administrator can give Authenticated Users Read/Write permissions and they can be used to handle access with shared files and folders at the NTFS level. This is a better situation that trying to limit access to sharing at the Share Access Control Layer. Using ’Deny’ permission is always the worst and last solution as it has a broad scope and it denies ‘Everyone’ by default.

Exporting A Directory Tree of A Folder in Windows

When working on your computer, a time comes when you need to explore an entire directory tree to a folder. Sometimes, all you want is a list of all your files and folders contained in a certain folder as a text document or an Excel spreadsheet.

You may, a couple of times, find yourself in a situation where you need to come up with a summarized document of all your files stored in a specific folder. This may not be a walk in the park for many Windows users. But no matter how hard it may sound, it can easily be done.

Most articles online won’t give you a step by step procedure, but here, this useful information will get you to exporting your directory to a folder without even breaking a sweat, no matter what version of Windows you are using.

STEPS

1. Navigate to the folder and open cmd
Using the Windows Explorer, go to the folder that you need exported. In our case, this will be F:\Meg.

Now open the folder.

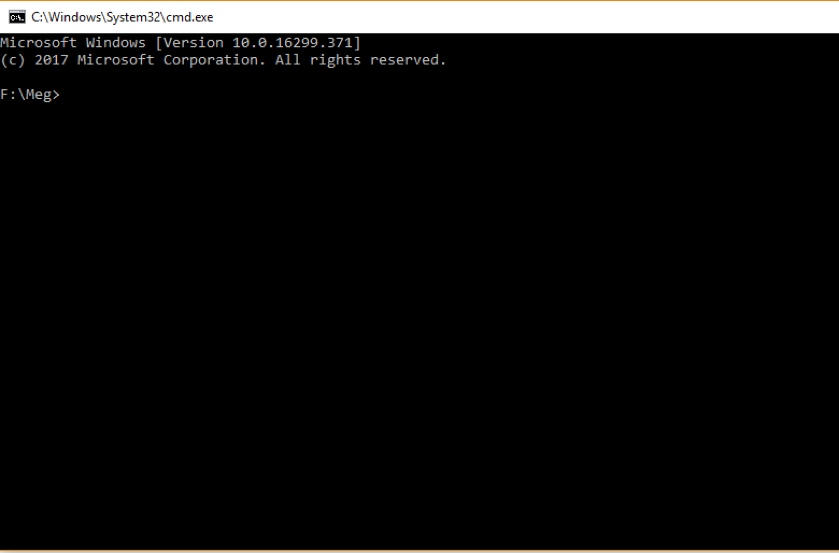
While here, key in cmd on the address bar which appears on the Windows File Explorer, then press Enter. This will open the Command Prompt right not he folder which you are interested in.

Once you are done, you will notice a Command Prompt that points to the specific folder. For instance, as you can see on the photo above that our Command Prompt is open on the F:\Meg folder.

Launching a Command Prompt with administrative rights is vital when exporting a directory tree of a folder which has files and sub-folders. There are loads of materials online which will guide you through opening a Command Prompt as an administrator.

2. Run the “Tree” command
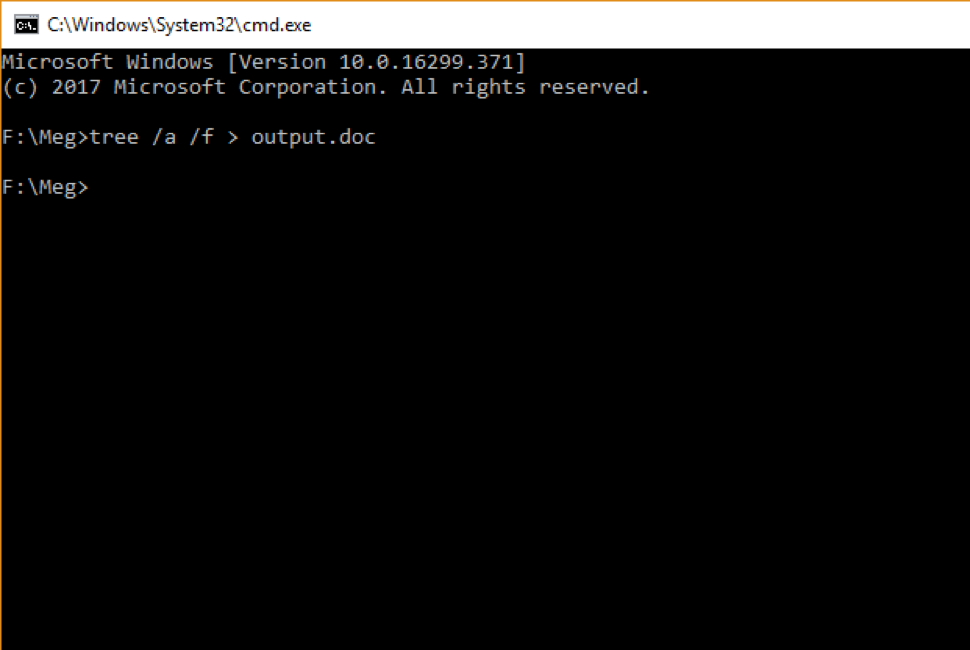
Running the ‘tree’ command is the most vital step while exporting a directory tree of a folder. This will let you get an orderly list of files and folders contained in the said folder. On the Command Prompt, key in tree /a /f > output.doc.

In our case, the “output.doc” is the document file where you will have your whole directory tree saved. Here, you can rename it as you wish, and also specify any file type, provided it is in a text format.

We are using a Microsoft Word document file but any other text file would work just the same. You may also decide to export the directory tree to a ‘text’ format which can edited using Notepad (.txt).

Double check to ensure that the command on the Command Prompt is correctly written before you press Enter. Sometimes, it may take longer for the command to run, depending on the number of files and folders that are stored in the parent folder. Just be patient and wait for the command to finish running.

3. Text file with the Directory Tree
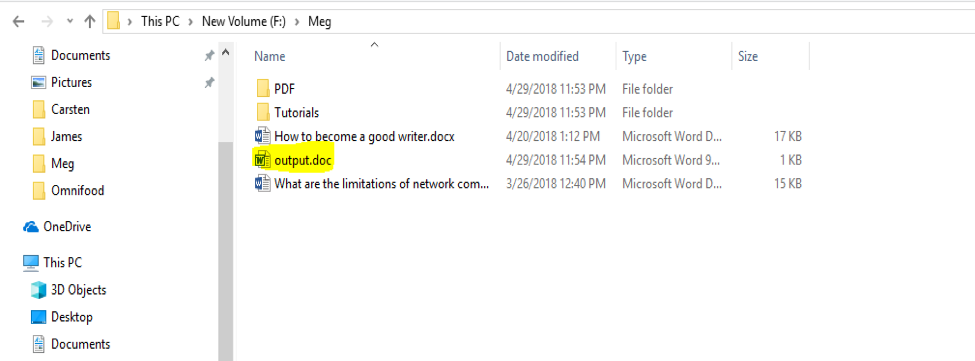
Up to this juncture, you are done with the Command Prompt and you can safely close it. Now, go to your Windows File Explorer and open the folder where you wanted the directory tree exported.

When you are running the tree command in Step 2, “output.doc” was the document file where the whole directory tree was saved. Now inside that folder, there will be a text file named “output.doc” which contains the directory tree.

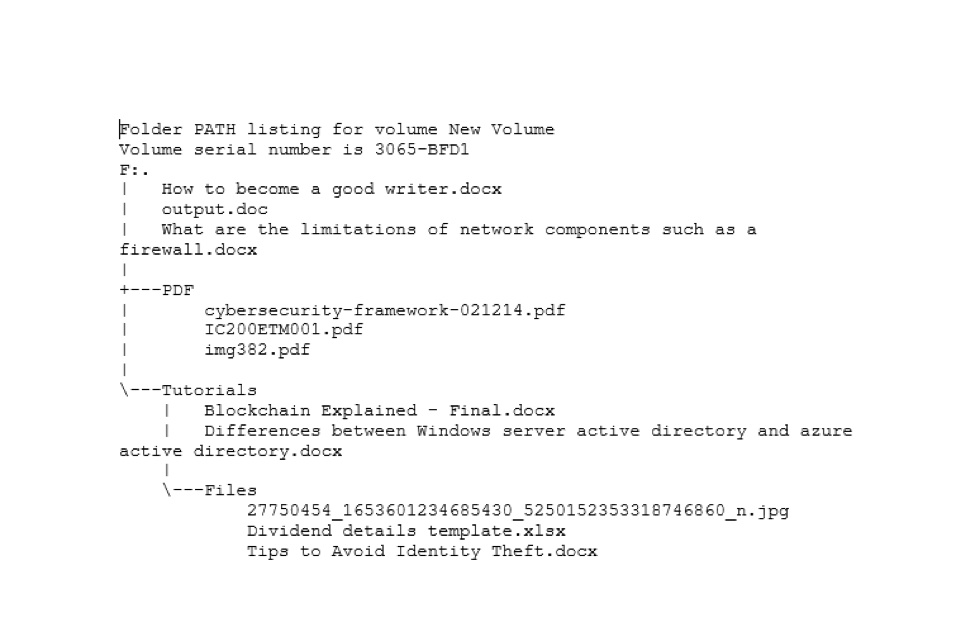
When you open the output file, you will notice that the whole directory tree is listed inside.

Exporting a directory structure to a text document is not that hard when using Windows. Always use the Command Prompt and ensure your commands are typed in properly.

We hope these few steps will aid you next time you need to export a directory tree of a folder in a text document.


Create Folder Reports with 3 clicks!

Try our NTFS Permissions Reporter now! We’re offering a lot of usefull Reports like Folder Reports, Owner Reports, Share Reports and of course Permissions Reports.

Get your free trial of the easiest and fastest NTFS Permission Reporter now!

How to Set Up Azure Active Directory Account

Microsoft is always dedicated to ensuring that individuals can access their computers and perform various tasks. The company established the Windows system to enable its users to launch and run various programs.

As such, it is designed to accommodate other minor programs which perform specified tasks, enabling the use of Microsoft and computers become friendly to several users.

This article focuses on Azure Active Directory Connect and its functions. Also, this article will enlighten the user on how to set up Azure AD connect in a computer, or any other device designed to use Windows system to run.

But first, one must understand Azure AD Connect, thereby understand its function. By understanding the primary functions, one will automatically be able to understand the various installation steps and their essentially to smooth running of the program.

BACKGROUND

Azure AD Connect is one of the main components of Microsoft, dedicated to synchronization of identities data between a device and the entire Microsoft environment. The program is designed to enable the user to configure and deploy the pre-requisites required for connection such as including synchronization and sign on.

Also, it has incorporated functionalities such as Dirsyn and AAD sync which were initially released as individual programs. Once installed by an administrator, the program will install a few essential programs such as .NET Framework and Microsoft Online Service Sign-in assistant, which are necessary for its functioning.

Thereafter, it installs and configures AAD sync, then necessitate sync in the Azure AD tenant. Lastly, it sets up the password harsh sync to create a sign-on option as selected by the administrator.

MODES OF INSTALLATION

Azure AD Connect may be installed in two primary ways, custom installation and express installation, depending on the preferences of the user.

Express installation is the default setting found in a newly-acquired program. This form of installation is designed for new users that are not yet conversant with the program. It provides the user with the basic installation tools.

Custom installation, on the other hand, is mainly implemented by users who are accustomed to the program and require certain functions that may not be accessible via express installation. Custom installation enables the user to implement various options that are not readily accommodated by the usual installation.

Express Installation

1. Sign in as the local administrator on the server where you will be installing Azure AD Connect on. The administrator authorizes installation of all programs on the computer. One then allows the installation of the program, particularly on the server that one wishes to be the main sync server.
2. Navigate and locate AzureADConnect.msi then double click on it. This will display a welcome home screen bearing the terms and conditions clause. Check off the Agree option, and select Continue.
3. At the bottom of the window, you’ll be presented with two options: customize and use express setting. Since we are using the Express option, hit the use express setting button.
4. A window will pop up, prompting for the username and password of the global administrator for your company’s Azure AD. Key in the correct details then hit Next.
5. The AD DS screen window will then pop up, prompting for the username and password of the organization’s admin account. For the username text field, enter the domain in either FQDN or NetBIOS format (i.e. pnl.co.uk\administrator or PNL\administrator). Ensure that every domain present in the next page is verified and once they are, hit Next.
6. Next up with be install screen. Click on install and commence the synchronization process till every element is fully configured. In case there is exchange on-premise, one must enable the Exchange Hybrid Employment. Lastly, click on the Install option and hit Exit once everything is installed.
7. Sign off, then sign back in again prior to using the Synchronization Manager.

Custom Installation

The initial process to custom install this program is not so different from the express installation. A user may opt to use custom install setting when the options provided by the express settings are not satisfactory to the user.

1. Follow steps 1 & 2 for express installation, then for step 3, select the customize option.
2. Proceed to install required components for the optional configurations. There are four options provided on this screen.
a. Password Hash synchronization
b. Passthrough authentication
c. Federation with AD DS
d. Do not configure
For the first three, users have the ability to sign in to Microsoft cloud services, such as Office 365, with the same password they use for signing in to their on-premise accounts. Select your preferred option and proceed to check off the Enable single sign-on box.
3. Next, you’ll see the Connect to Azure AD screen and be prompted for the global Azure AD admins username and password. In case the administrative account has multi-factor authentication enabled, ensure to verify it using a verification code that is sent either via a phone call or message.
4. Once the option is enabled, a connect to directory screen will pop up. Select the Active Directory option and add a forest name necessary credentials.
5. After this, an option for add directory will appear with two choices — create a new account and use an existing account. One then uses the necessary credentials for the account and proceeds to the Azure AD sign-in configuration. All the options presented on this screen must be verified. If not, one would have to verify them then just refresh the screen. Then select a suitable under principal name then click on Next.
6. Other options such as the domain and OU filtering must also be filled. This option allows the user to either synchronize all domains or synchronize only selected domains.
7. Select uniquely the user for the program. There are two options present here — users are represented only once across all directories or the user identities exist across multiple directories. Also, one must select how the users need to be identified.
8. Proceed with synchronization of data for various users and devices then hit Next.
9. An option feature screen will pop up. Select the appropriate options according to the desired preference.
10. Then, an option for available apps within the Azure AD will pop up. Just choose all the suitable apps then hit Next.
11. Select the necessary directory extension, then move on to configure and install the program. Just like for express installation, just put in the proper forest credentials to enable the sign on option.

Planning before implementing NTFS Permissions

If you’re a Windows Administrator, you’ve probably experienced the nightmares in managing folder permissions. This is common in large or even small environment where no proper planning is made before giving the permissions. Such negligence could lead to complication and exposes the environment to security risk. Below are some examples:

  • Users or groups having access to folders not intended for them (e.g., Sales Group can view Management’s folders)
  • Applications fail to run because of lack of permission (e.g., Backup Software unable to perform tasks on specific folders)
  • Or just too convoluted folder permission that Admins are better off doing them from scratch.

Why Planning is a Crucial Step Before Implementing NTFS Permissions

All above examples are all due to incorrect planning (or the lack of it) before the implementation of NTFS permissions. One may point out that it can also be due incompetency of the person doing the task. I agree that could also happen, but if there is proper planning, documentation, and layout, these problems can be avoided even if you let your junior admin do the task.

As part of the Planning phase, here are some of the things an Admin can do:

Design a Folder Structure

Before creating the actual folders, you must know what folders are to be created. Whether you prefer digital or physical board, list the shares that will be created for each department or group. Work with the knowledge you already have of your current environment. There will be changes along the way (e.g. new department or new projects) but this would be a good start.

Identify who has access

After listing the shares to be created, map out the users or groups that have access to specific folders. You may List down the users or groups and draw a line to connect them to the appropriate shares. How ever you want this done, make sure to have fun doing it!

Plan the Permissions

This one is critical so take your time going through the shares and groups and write down the appropriate permission. If you use naming conventions such as R for Read-only or F for Full Control, make sure to be consistent to avoid confusion along the way.

Proper Documentation

A good planning always has good documentation. It’s always good to have something to go back to when you forget. This not only serves as your guide but something you can pass down to your junior staff or even to your boss. With that said, documentation must be clear and concise. Also, changes in the organization are inevitable so whatever method you used to document, make sure it can easily be modified and expanded.

Being an Admin can be stressful, but if you have proper planning, implementation, and clear documentation, it smoothens administration and helps you focus on other areas.

A more detailed guide on Planning and Managing NTFS Permissions can be found here (no signup, incl. free eBook):

Take Ownership of Windows Folder and Files

What you need to know before taking Ownership of Files and Folders

Taking ownership of files and folder is an easy thing to do. Instructions are all over the internet that even a regular Windows user will find it simple and effortless. But have you ever wonder why you need to do this and it’s effects? Now before you take the ownership of all folders in your PC (please don’t!), I will share some information about taking ownership of files and folders.

Concept of File and Folder Ownership

The owner controls how permissions are set and to whom permissions are granted on the files and folder. By default, the owner would be the user who created the object. In simple terms, if you created a folder then by default you become the owner of that folder and having ownership means you get to decide who can access the folder and gives you the power to transfer the ownership to another user.

Who can take and transfer ownership

As mentioned above, the default owner, the user who created the file or folder can transfer the ownership. But aside from the owner, other user or group with certain permission can also take the ownership. These are:

  • Member of the Administrators group
  • A user with taking Ownership permission
  • Member of the Backup Operators group

Why do you need to take the ownership?

Because you can! Just kidding! Have you tried deleting or renaming a folder but you get access denied? That’s most likely caused by lack of permission, and being the owner of the folder allows you to do some changes on that folder. This is just an example why taking ownership is needed, and I’ve listed couple more examples below.

  • You connect an external drive from another PC, and you’re denied access to the folders
  • Upgraded from Windows 7 or 8 to Windows 10 and you wish to delete Windows.old folder to free up some space
  • You attached the 2nd disk to your PC. The disk used to be a system drive (with OS Installed), and you’re denied access to the folders
  • Make changes to system files (example: replace a bad .dll file)
  • Manage files or folder owned by the user account that’s already deleted

How to take ownership of the files and folders?

Here I will show you how to do it via GUI. There is also a built-in command line tool in Windows called takeown.exe if you want to do it via command line.

In this example, we will take ownership of the System32 folder. Right-click the folder you wish to take the ownership and go Properties. Click on Security tab and then Advanced

The Advance settings will show you the current owner of the file or folder. Click on Change

Enter the name of the new owner and click Check Names or click Advanced to find the user.

Once the new user is entered, click OK and now the new owner will be shown. Tick the option “Replace owner on subcontainers and objects” if you also want to take ownership of the subfolders and files. Click OK and you’re done!

Taking Ownership from TrustedInstaller

Although this article talks about taking ownership of files and folders, it is critical to know that taking ownership from TrustedInstaller can lead to system failure. The TrustedInstaller account is used to secure core operating system files and registry keys so unless you’re very sure of what you’re doing then I don’t recommend messing with this.

Wrapping up!

Taking ownership of files and folders will give user capability to override restrictions and allow them to perform the necessary task. However, always take extra precaution when changing the ownership especially on system files. Have I said that already? Well, that’s because I wanted to emphasize this. If you need to change it for temporary access then, by all means, do it but don’t forget to change it back to the original owner (TrustedInstaller) to avoid issues with the Operating System. You might also want to keep track of which folder a user own as some users may have taken ownership of certain folders. If you’re the only user or admin on your PC, then it might not be necessary but for a larger organization, having a tool like FolderSecurityViewer will help you with this task. Be sure to check it out!

Useful Resources